
 In this time of madness... I made a cheesecake. Not just any cheesecake, but MY cheesecake. I have had this idea in my head for a while now and I just never really got around to making it until now. I used a combination of butterscotch and dark chocolate for a decadent flavor combination that is mouthwatering and delicious. It pairs well with the tartness of the filling and the sweetness of the cookie crust. I should make cheesecake a little more often. This is another short and sweet blog because I have a lot to say in a different post that I am not ready to discuss, so please enjoy this cheesecake! 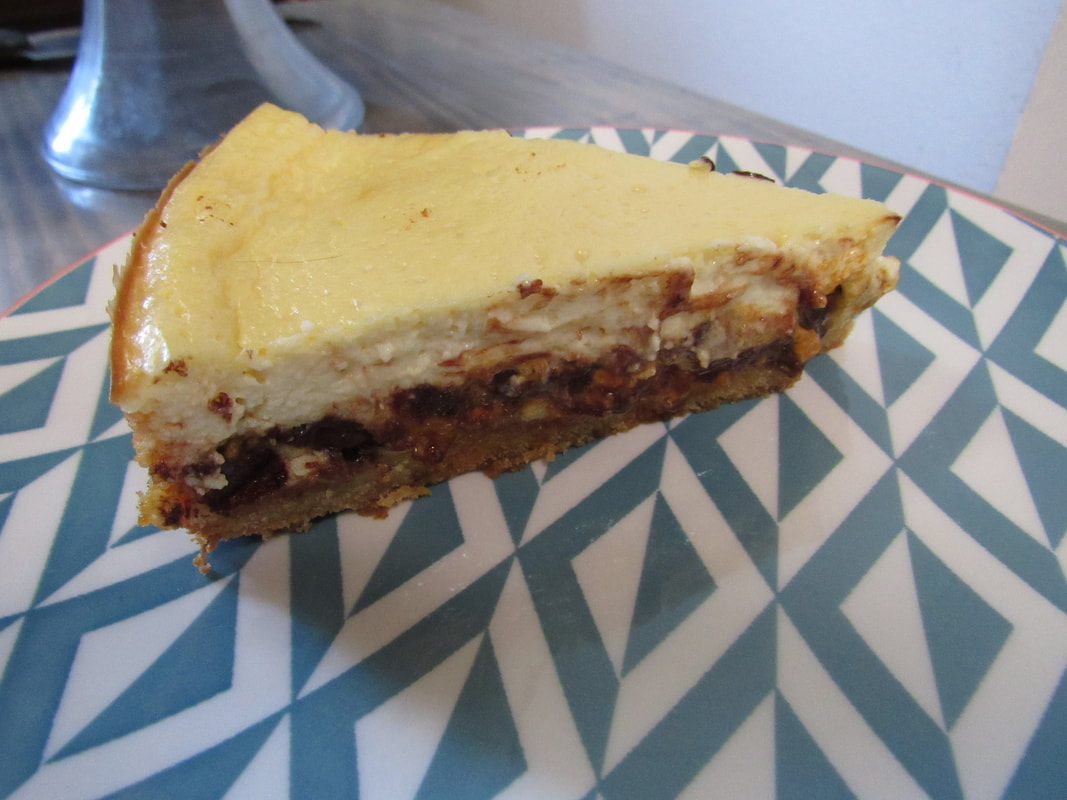 Recipe
Method
Enjoy, my foodie friends.
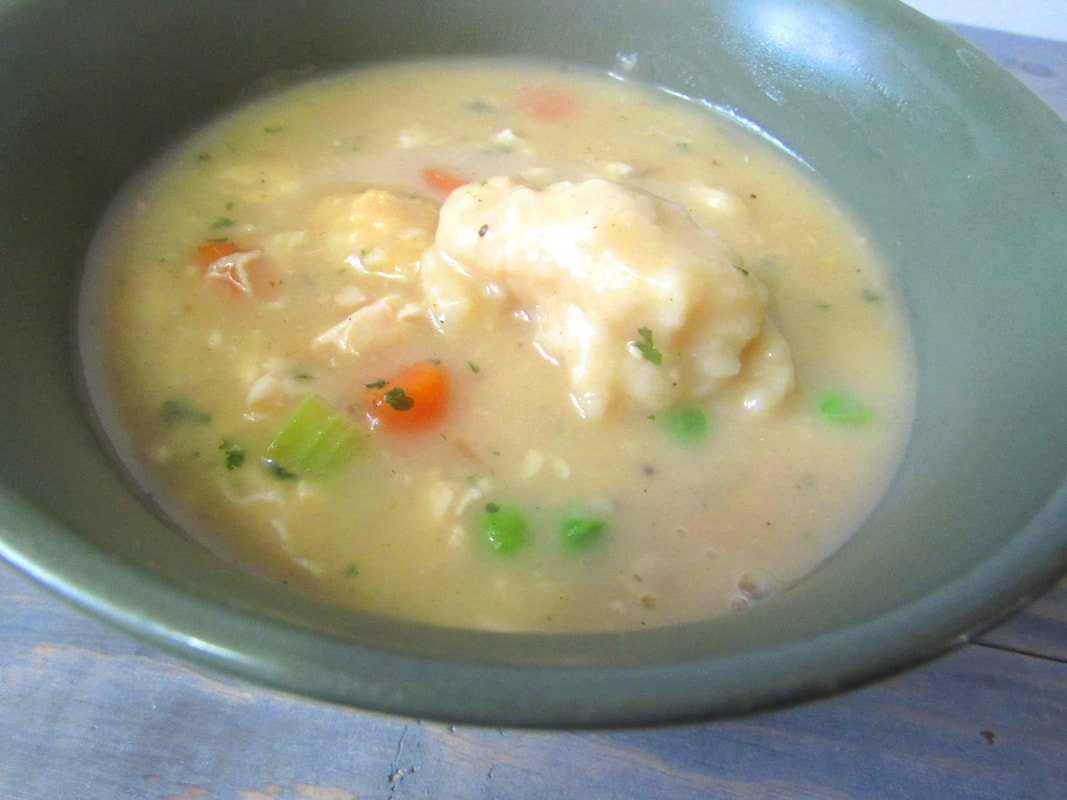 Dearest FoodiesThis one is going to be short and sweet. Times are tough, right? But you don’t need me to remind you of all that is transpiring in the world right now. We all know that things are cruddy in general. So instead of going on a spiel about the barren wasteland of the grocery store, I will spare you all those details. I have a little story about my dad instead. My dad did three types of meals spectacularly: breakfasts, stews, and breads. I mean, there was a time when he made some stuff that I wouldn’t care to eat again, but he did make some beautiful chicken n dumplin’s with the fluffiest, cloud like dumplings ever. I found myself thinking about his stews and such last night in the wake of his death anniversary, which is a vast improvement to the blubbering I did the year before. I thought, “You know what? I am going to make this.” But I don’t have leftover chicken and I certainly don’t have any chicken broth or stock on hand. Oh yeah, barren stores and such. Ugh. I do, however, have canned chicken breast, and I do have chicken flavored stuff like bullion cubes… I can do this. With that, I share with you: Hard Times Chicken n Dumplins
Method
In Closing...This is a quick little recipe of comfort. It uses mostly pantry items and is a good way to fill yourself up. I hope you enjoyed this little recipe.
 Lots of things happening.Hello, dearest foodies. I know it's been a while again since I posted, but I promise I am not gone yet. Life has been busy busy for me as of late... what, with moving and all? That's right, Bruce and I have relocated from the little trailer in the country to a little apartment in the city, basically started over fresh because we wanted something better for ourselves. It is a bittersweet thing to have moved out of the first home we shared together, but it was necessary. We moved in the middle of December and we are still not all unpacked, but we're getting closer. I will be doing a recipe soon though, I just have to decide what.  I don't have much to say, so here are some kitties to brighten your day?
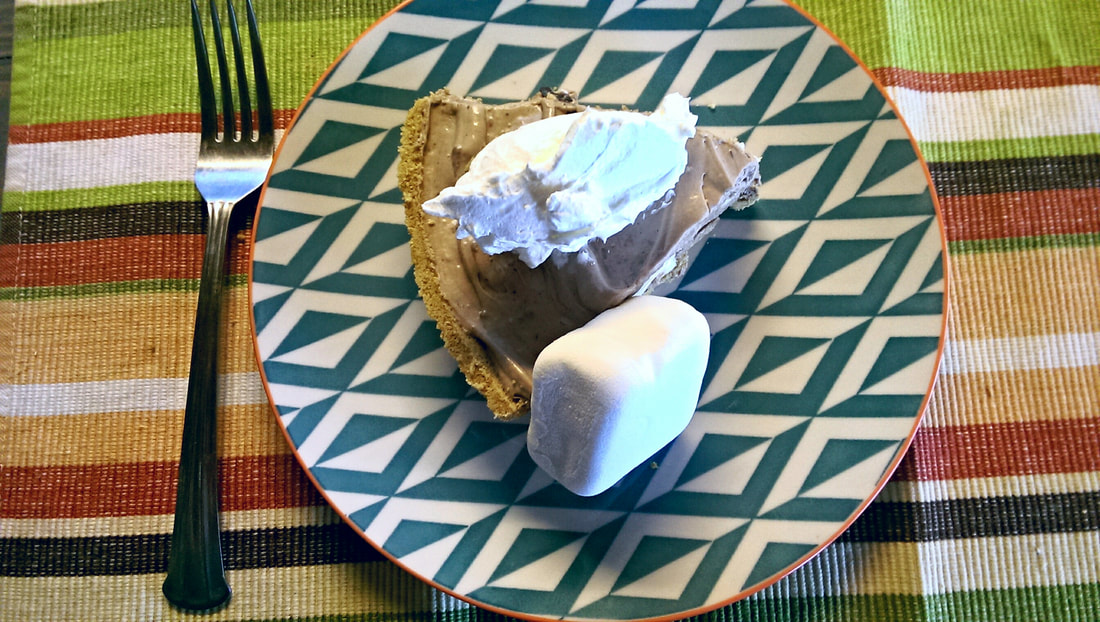
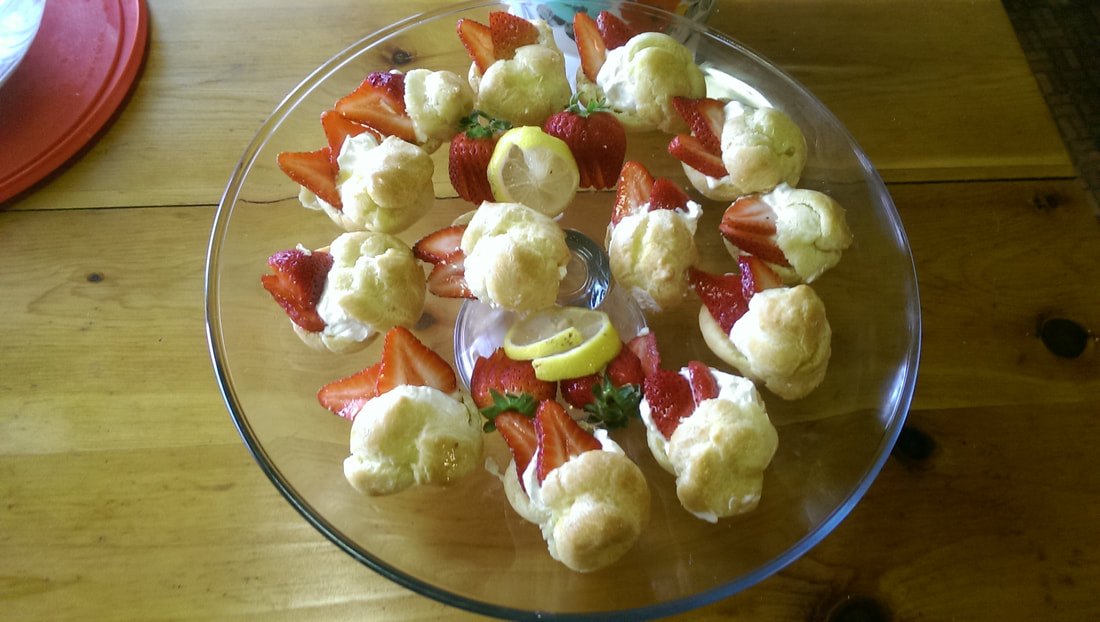
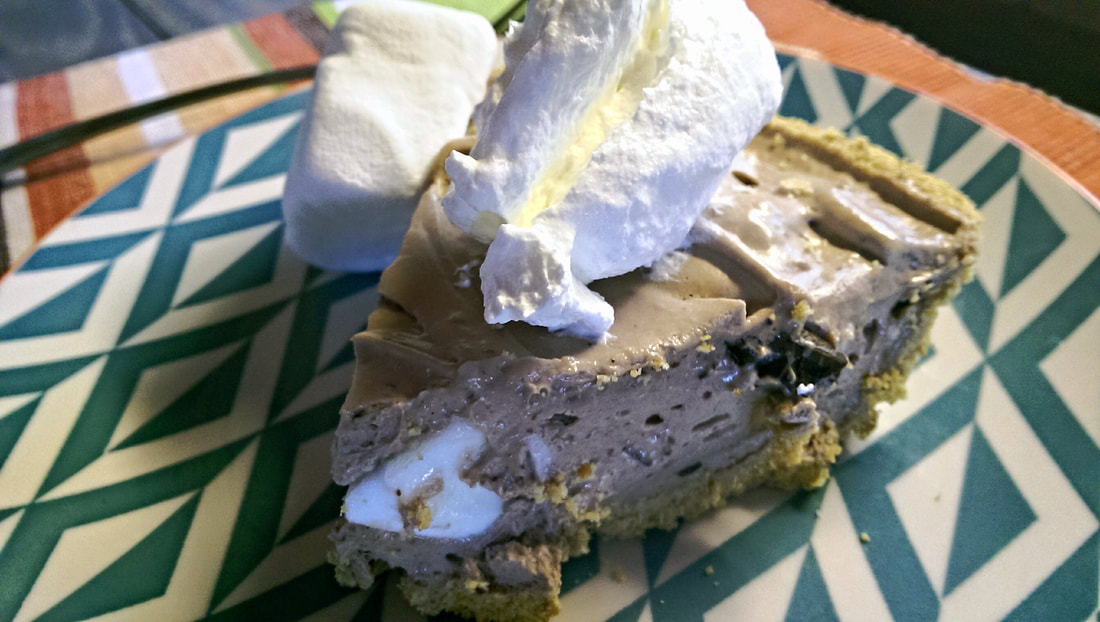 I wanted to make a no-bake cheesecake... ... that tasted like S'mores. So what I did was exactly that! This was a joy to make and this can be had all year round and it is easy as... well... pie! While I don't have some amazing story that comes with it, I thought I would at least give you a quick recipe so that, again, you knew I hadn't forgotten about you all. I made this pie back when the summer was just about to start and I had wanted to make some stuff ahead for the blog and just never got around to posting it until I remembered it was in my folder. I bought a bag of those giant s'more marshmallows and they are what actually inspired the whole blog to begin with. I even decided to roast the marshmallows to give it that toasty flavor and it was definitely the right call. It definitely tasted like a no-bake cheesecake and s'more's combined, and it was a delight to eat. RECIPE
 And then...
And that is it. This has a nice smokey flavor to it and it tastes nice and tangy from the cream cheese. Additionally, you could add flakes of salt but I don't think it needs it, as the acidity in the cheese does cut through the sweetness, as well as that pungent flavor of the dark chocolate as opposed to milk chocolate so it isn't overly sweet. You do not need to add vanilla since it is already in the marshmallows.
I hope you enjoy! I know this is another quickie! As always, happy eating, happy belly. 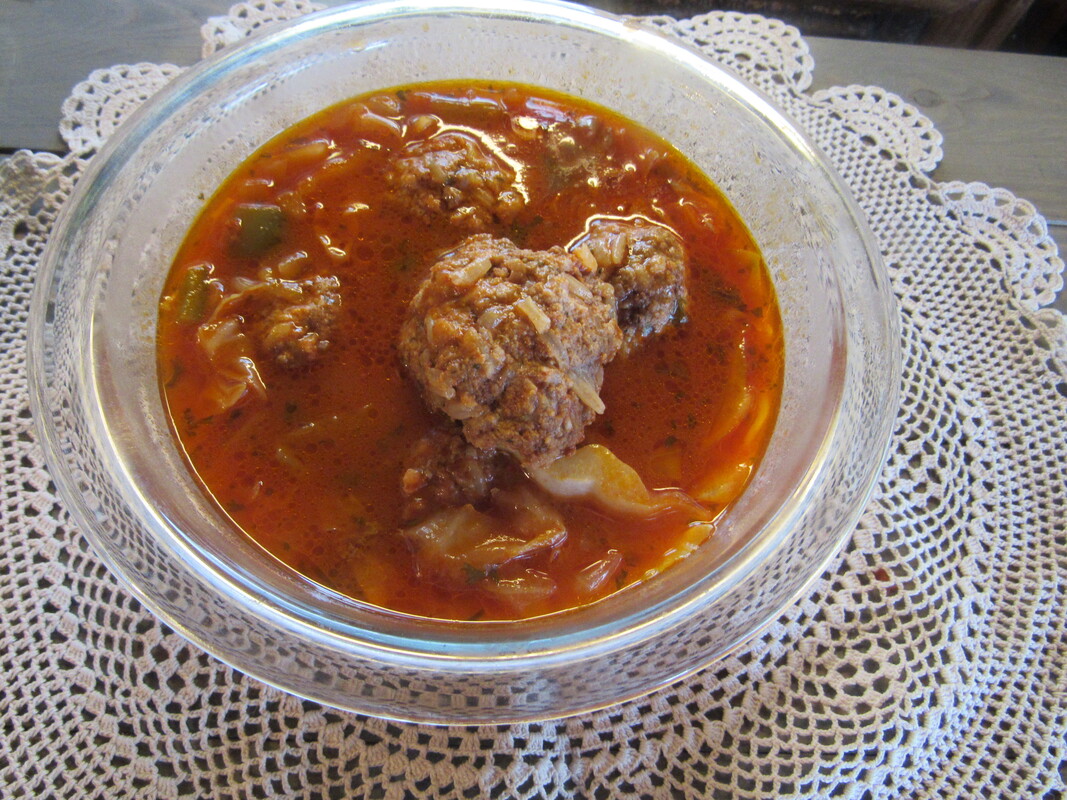 As you may or may not know... I am a cabbage roll junkie... But sometimes I just don't want to spend an hour trying to get the cabbage leaves peeled without tearing them and it is this huge, long winded process that I thought I wanted to cut down. It was also in the middle of the summer that I decided to go balls to the wall and make soup. Foolhardy? Absolutely. Worth it? Absolutely. I was really craving golabki, I eat the stuff nearly all year round if I can get away with it... but didn't want to wrap stuff or peel the leaves as I said, and this really is the faster way to get these flavors. I don't have some fantastic story about how this came to be. I know it isn't an original idea, I did see something similar on YouTube by a woman named Noreen, but that was some years ago. I wanted to come up with my own idea and even maybe a little bit of goulash flavorage or stuffed pepper to add to the dish. So there are a few things, one of which doesn't need to be pointed out at all but I am going to own up to it anyways... It doesn't look perfect. There, I said it. But looks can certainly be deceiving, right? The fact of the matter is, I did not want to change the integrity of the meat. In the original dish, the meat is placed in the cabbage raw and cooked inside... searing off the meatballs would have completely changed the flavor profile, and I have seen it done the same way for Italian Wedding Soup where the meatballs were not seared. Now, this doesn't mean to say it would make it disgusting, it just wouldn't be the correct flavor profile. If you want to sear your meatballs for presentation, by all means, I am just saying that this way is closer to the original flavor. Second thing is that regardless of whether you make them as rolls or soup, this dish tends to get greasy from the fat that comes off of the meat. This is one soup where i don't mind it so much, but if you want to get rid of the fat, let it cool completely and then skim it off when it is solid, but leave some for flavor. Or you can boil your meatballs in water and reduce the amount of fat, but again, it would change the flavor profile. I promise you that this will make you very happy if you are a cabbage roll fanatic like myself. The flavors are rich and hearty, and your belly will be nice and padded by the time you eat what you've served to yourself. The Recipe
Prep time shouldn't take more than 30 minutes tops between the chopping and the making of the meatballs, cook time is about an hour but is more of a set and forget type of thing (You really only have to get up three times to stir). It serves at least 10 people This was just a quick one! I know this was just a quick blog post, but I wanted to get something up so you all didn't think I forgot any of you. My husband just had his surgery not too long ago and I am finding it a struggle to cook for one person since I am a nurturer and like to make people happy with food. Things will even out eventually.
Until then, my friends, I just hope you enjoy the recipes I am able to bring. I have a few that I need to redo from my old blog and such, plus three or four more things already made that I completely forgot about. You'll see :) Until then... Happy eating, happy belly, my foodies. 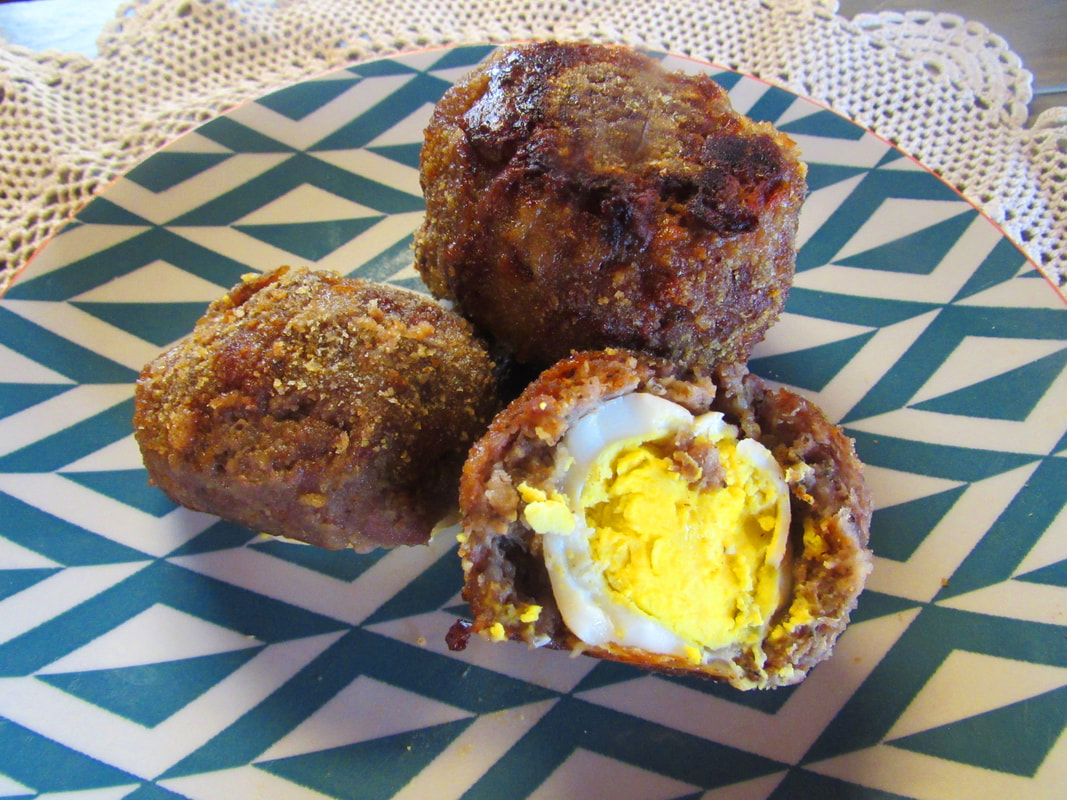 Yum. Hey hey foodies! I know that it has been awhile again, but you should know the deal by now if you are just coming in: I have health issues and such, sometimes I’ll be gone for months. I have some exciting news in any case in that my husband just went through the gastric sleeve surgery, and I am making efforts to stick to healthier grub for the most part. As you know, my blog is not about dieting, although I will put a special diet recipe up every now and then so as not to leave people out. I will still post, but only when the mood strikes me. Today I have for you some Scotch eggs, super easy meal to make and so very yummy. I am doing the baked version, the traditional is deep fried. So what are Scotch eggs? They are boiled eggs wrapped in sausage and dredged in breadcrumbs, then deep fried (or in this case, baked). They were made somewhere in England, not Scotland, around the mid 19th century and was an easy way to carry your lunch around when working. They are now a widely popular street food and pub grub in Great Britain, and in pubs about the world. My first encounter with these puppies was when one of my best friends showed me how her dad makes his, and it is a delicious end result you get because of the ketchup and the saltine crackers he uses in the meat. I have since learned the more traditional route of making them and I shift between two different recipes. They are actually easier than they look and have only a few ingredients. I am going to give you my version of them in a baked state. These are hardly considered diet food but if you can get away without deep frying them, I think it'll be just fine. Recipe
 That flour doesn't act as a glue, and there may or may not be cracks in the exterior when one is done baking their delicious Scotch Eggs, but that flour turns the juices into a little bit of a gravy instead, which adds to the creaminess of the egg yolk. I am just going to assume that the yolk turns out a bit runnier in the deep fried version, but I never tried making that. I absolutely recommend that you give this dish a dry, even someone else's recipe, because you are missing out if you don't! What is really cool about just one egg is that you get meal of convenience and it's also pretty dang filling. A little bit about Shawna Shawna and I go way back. We met in high school and chummed it ever since. We were such good friends that we drew pictures together, we drank lots of coffee at the awesome Fourth Coast Cafe, and we love each other as sisters. She and I have been through thick and thin, along with our other friends, Lacey, Inga, Kittie, Dawn, and a few other people. She is our resident Snow White... You know, opens the shutters and sings to the birds and into wells? Anyways, I guess I owe Miss Pegasus for some of the recipes I have learned over the years, including the eggs. I hope my rendition brings you as much joy as hers did.  Struggle Meal #2  Have you ever walked into your grandma's house and been greeted by the smell of her home cooking? Beef and vegetable soup steam is wafting in the air and causing you to salivate and think, "Damn, that smells good?" My grandma is not so fond of cooking anymore because of her joints bothering her, but I still associate the smells of her cooking with her house; it is only second after the smell of her cedar chest that makes me happy. My grandma is famous among family and friends for a few particular dishes: the aforementioned soup, bean soup, and beef and noodles. My grandpa runs a business where he does taxes for people, and back in the day, his employees would request the beef and noodles because it is that good. I got lucky in that my mom cooked that for my sisters, my dad, and me when we were younger. Of course, I did not have the same appreciation for it then that I have now because I was picky and loathed gravy... But as I grew older, I began to eat it with joy in my heart. This meal is something grandma just threw together and everyone loved it. My mom told me that my Uncle Steve would eat a whole bag of noodles with the beef and gravy just on his own. It is the kind of food that you make and there are rarely leftovers if at all, which I can tell you is the truth because Bruce ate the hell out of it last night. It is the kind of food that makes me glad for my grandma. She won't be here forever, which is a sad truth nobody really wants to think about... She says so every time I see her, though... And I want to have as many memories as I can have with my sweet, kindhearted, soft spoken, goofball of a grandma. She is one of my favorite people in the world and I am so glad to have her in my life. She means the world to me, and so does her cooking.  Let's talk about why it's a struggle meal. Normally people don't associate steak with struggle... After all, it's a treat, right? The great thing is that steak can be pretty cheap if you get a cut that is normally tough and have less fat or flavor than something like a porterhouse. 1 lb of beef bottom round or eye of round, for instance, is one of the least expensive cuts of beef that you can get at around $4. That is still kind of pricey, right? But think about stretching the meal. My grandma was feeding a family of six with about a lb of the stuff at a time, and there is enough cooked that there COULD be leftovers once they are stretched out. So you have the beef, and you have a can of condensed broth, which is about $1 or so depending on what the label looks like... A bag of egg noodles is around $1, 50 cents worth of onion, 10 cents worth of garlic, pennies worth of the seasonings and flour. My grandma would use two bags of noodles, so tack on another buck and call it good. That makes it less than $8 to feed a family of 6, so just over a buck a plate. That is with inflation. I am going to give you two recipes for this. First will be the original recipe which I highly suggest you make before you try it with my adjustments. Her recipe is simple and quick and mine is a little more complex out of experimentation to develop more flavor notes. My recipe is still cheap, it's only a difference of a few quarters. Grandma's Recipe 1 lb beef bottom or eye of round, thinly sliced into strips ¼ cup flour for dredging 2 TBSP Canola oil 1 small onion, sliced 2-4 cups beef broth/stock 4 cups egg noodles, partially cooked Salt, Pepper, Horseradish, garlic, parsley all to taste
My Revisions 1 lb beef bottom or eye of round, thinly sliced into strips 2 egg whites ½ cup cornstarch 1-2 teaspoons or a big dash of Worcestershire sauce (traditionally, soy sauce is used) Olive Oil 1 medium Onion, chopped ¼ cup bell pepper 2-4 cloves Garlic 1 TBSP Horse radish (Optional) 2-4 cups Beef broth or stock 1 bag egg noodles (Or no yolks) 2 TBSP butter Salt, pepper, celery seed, parsley to taste
 I hope you try both versions! Even though this started off as something thrown together, it is just one of those things that feels like home. It is a gift I wanted to share with you because I felt that it deserved some recognition. Maybe it will give you good feelings and make you think about your own grandma like it does with me. It is savory and the gravy is nice and silky, and it's sort of like eating a bowl of beef and noodle soup but with gravy instead of broth. Like I said, you should try her version first because it's the best. Mine is good too, but it isn't the same as grandma's... With that being said...   Okay folks, I've got a lot happening on here as of late and I just wanted to shoot you all a quick update. First and foremost, you may have noticed that I have been rearranging things here on the site; I really didn't like having a landing page that really didn't make sense to what I wanted... I didn't even know you could change it until recently, and it pleased me very much to find out you could. So I have been trying to remove stuff that isn't necessary to the blog, and adding stuff that makes sense...
For instance, I have started making my recipes into PDF form for printable download... Anyways, here is a list of things I have done so far: Removed the craft part of the blog Added downloadables Fixed cosmetics Stuff I am working on: Collab page Struggle Meal recipes Leftover reboots Stuff I am considering: Adsense... Do I or don't I? If you have anything you want me to test app wise, you might have to talk to Weebly first because there are not any food type applications compatible with weebly. Please DO push some on them, it'd be great to be able to have a recipe card on here instead of having to consider whether I want to transfer to Blogger or stay here. I like it better here as far as streamlining. That is it for now... If you have any questions or comments, please do leave em with me via comments or email. Please consider signing up for the newsletter so I can update you every now and then. Thanks, Kimmie 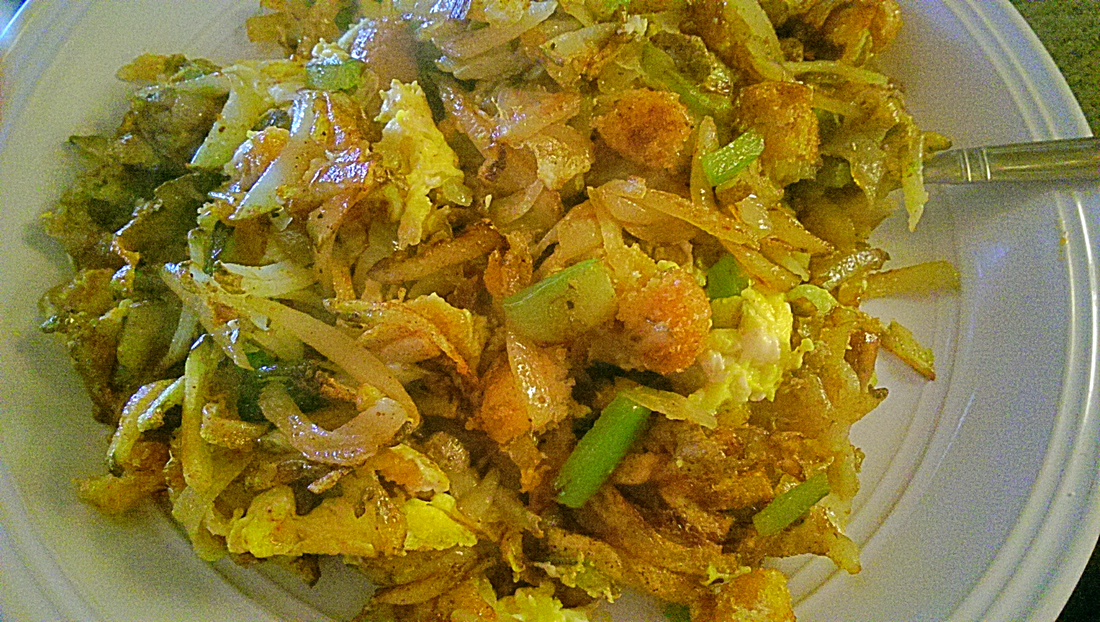 Good morning...  Every time I mention the name "Slumgulean," people give me that puzzled look wondering what in the world I am talking about, and there is a story behind it and how it has been a part of my family for a long time. The answer to the question is that Slumgulean is a struggle meal; a poor man's breakfast/dinner that my grandma used to throw together in order to feed four boys and use up some ingredients that she had readily available. Back in the day, my grandfather worked for Ekrich, delivering their product as a truck driver, and my grandparents would end up with a butt ton of sausage and balogna to eat throughout those years. One of the ways my grandma would fix smoked sausage would be to throw it into her Slumgulean and it would be stretched out with other ingredients that were inexpensive but nice and filling. She would slice the sausage up and fry it along with the taters, add some other ingredients and round it off with some eggs, and boom! My father always spoke fondly of it and how he could never quite get it to taste just like hers... Hell, I can't ever get anything to taste just like my mom's, but that is because it differs from individual to individual, even if you think you added the exact measurement of each ingredient within the recipe. I have had so many variations of this dish and have two or three favorite combinations of what is essentially a "garbage hash." It is not as unique as some might think, really, but it is special enough to me that I decided to write this blog post to honor my dad's original post on the old site, and to honor my grandma because she cooked with love. In fact, my dad had written his blog post right before the final crash of Foodie-zoo, and it would not sit well with me if I didn't say something about it. It is true that my dad had a limited bank of recipes that he cooked and tasted awesome... He made the BEST home made bread, his biscuits were like fluffy little clouds, his beef stew and his chili were to die for, and his breakfasts were awesome. It was one way that him and I bonded, as I had bonded with mom over the stove too. When it came to the hash, he always brought grandma up and how hers was the best. I don't remember the first time that he made it for me... I had always assumed he put his nasty, canned corned beef hash into it... You know, the stuff that looks like canned dog food and smells like it too? Yeah, so you can probably imagine that I wasn't even interested in trying it for the longest time. In fact, I refused to even look at it when I was a kid because of how my mind associated it with the stuff in the can. I believe I was a teenager when I actually began to pay attention to some of the things that he cooked. The first things were his breakfasts, of course, and how he taught me that you do not need milk to make the perfect, soft scrambled egg that was still fluffy and tasty. I watched him throw various things into a pan, and I actually gave myself a chance to smell it and enjoy the aroma. When I tried it, I was in for a pleasant surprise... It was good... I mean, REALLY good. Him and I would talk from over the counter since the kitchen at my mom's house is not that big, and he would tell me stories about grandma or grandpa, adventures in truck driving and such. There was a hilarious story about how grandpa would truck drive and smoke in his sleep, shifting gears with one hand and puffing on an invisible cigarette with the other. My dad would take a clothes pin and stick it between the forefinger and middle finger, and sure enough, Grandpa would "puff" on the clothes pin... We're talking about the round ones, not the ones with springs. I am sure if dad had done that one, there would have been hell to pay. As it was, my grandpa would wake up with the clothes pin between his fingers and he would get mad and cuss. My dad also told stories about my grandma and how she would knock people upside the head with a fireplace poker for cussing in her house. I guess that she was a spitfire while she was alive and she had all the respect in the world for it and for the fact that she was also the sweetest person alive when she wasn't provoked into being irate. I don't remember anything about her, I don't remember ever seeing her or cuddling her, but my dad explained to me that she loved my older sister and me to the moon and back, we were the apples of her eye because she had wanted granddaughters so badly after raising four boys. I wish I had gotten to be around her longer than three years because she had a wealth of things I could have learned from her, like quilting and knitting. I am happy to say that I at least have the legacy of her hash browns, even as insignificant as it may seem to others. It means the world to me to be able to connect with my grandma. So if you are up in heaven listening to my thoughts as I type this blog post out, grandma, know that I am so glad to have a recipe to share with the world because you made one up. 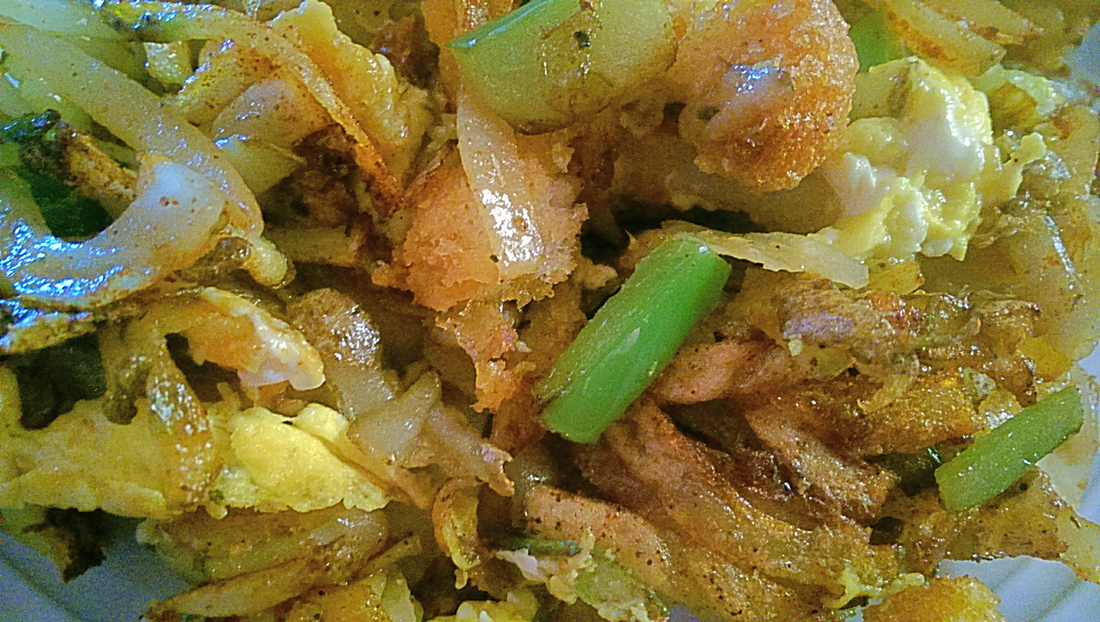 Ingredients per two people: 2 TBSP Canola or Vegetable oil 1 TBSP Butter 6 oz of whatever meat you want (optional, I usually choose bacon if I have it, or breakfast sausage. I have seen dad use ham and smoked sausage before.) 1 potato of any size, shredded, sliced, or diced 1/8 cup of sliced or diced onion 1/8 cup bell pepper (Optional) 1 slice of whole wheat or white bread, torn into small pieces Salt, pepper, red pepper flakes, garlic, rosemary, and paprika all to taste 1 egg. beaten 1 handful (About 1/2 cup) of cheese of choice (Optional)
 I hope that this recipe makes you as happy as it has for three generations of my family. Maybe you will find yourself telling stories while cooking it in the future. It is a small bit of comfort in these days where we are uncertain as to whether we can safely feed our families and be able to put some nutrition in, even if it isn't what a fitness guru would call "healthy eats." The point is to line your belly when you are hungry, and this stuff is super filling and very delicious. Have a good day, my friends and...   This recipe is in collaboration with Capt'n Kenny's Fresh |

The Eccentric Foodie
Food Tip
Cooking bacon in the oven is the easiest way.
Recipes
These are various recipes that either I created, or I found and adjusted to what I thought would be awesome or even healthier. Archives
March 2020
Categories
All
|


 RSS Feed
