
 In this time of madness... I made a cheesecake. Not just any cheesecake, but MY cheesecake. I have had this idea in my head for a while now and I just never really got around to making it until now. I used a combination of butterscotch and dark chocolate for a decadent flavor combination that is mouthwatering and delicious. It pairs well with the tartness of the filling and the sweetness of the cookie crust. I should make cheesecake a little more often. This is another short and sweet blog because I have a lot to say in a different post that I am not ready to discuss, so please enjoy this cheesecake! 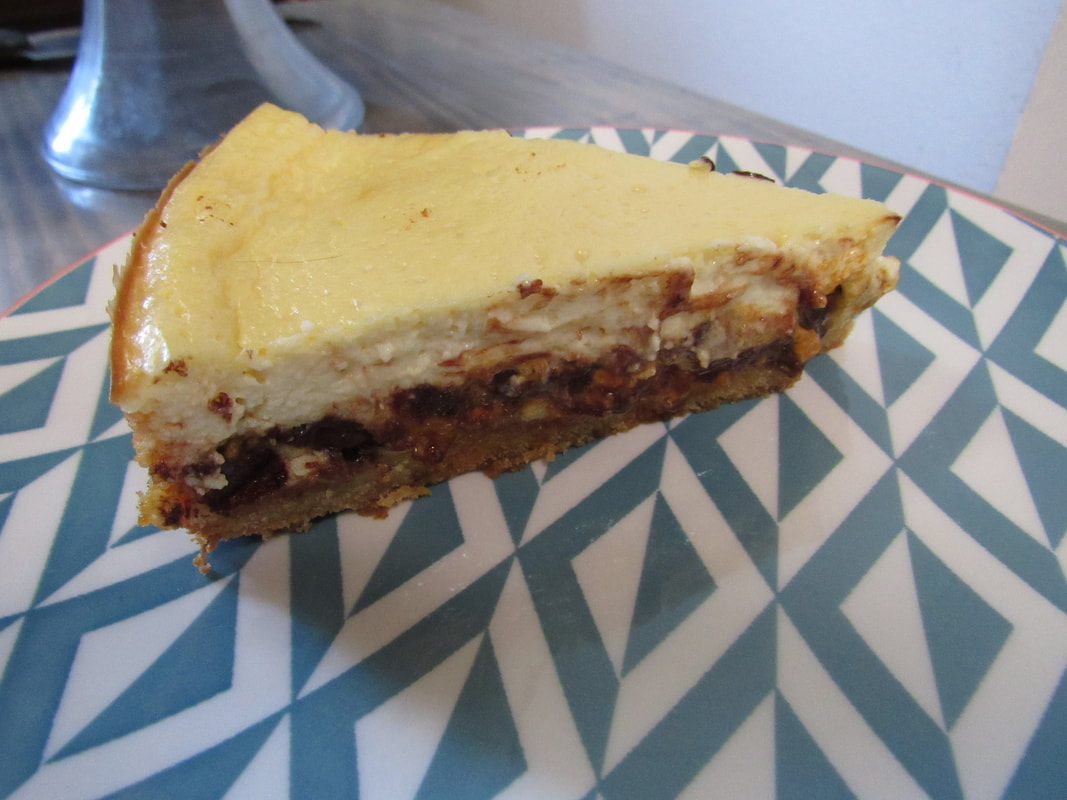 Recipe
Method
Enjoy, my foodie friends.
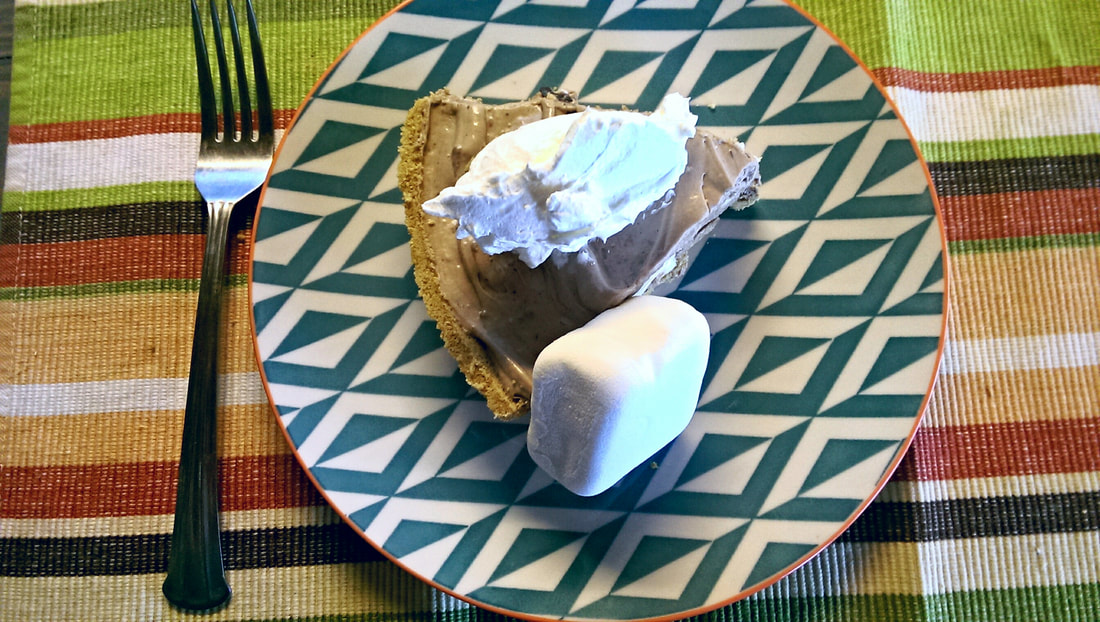
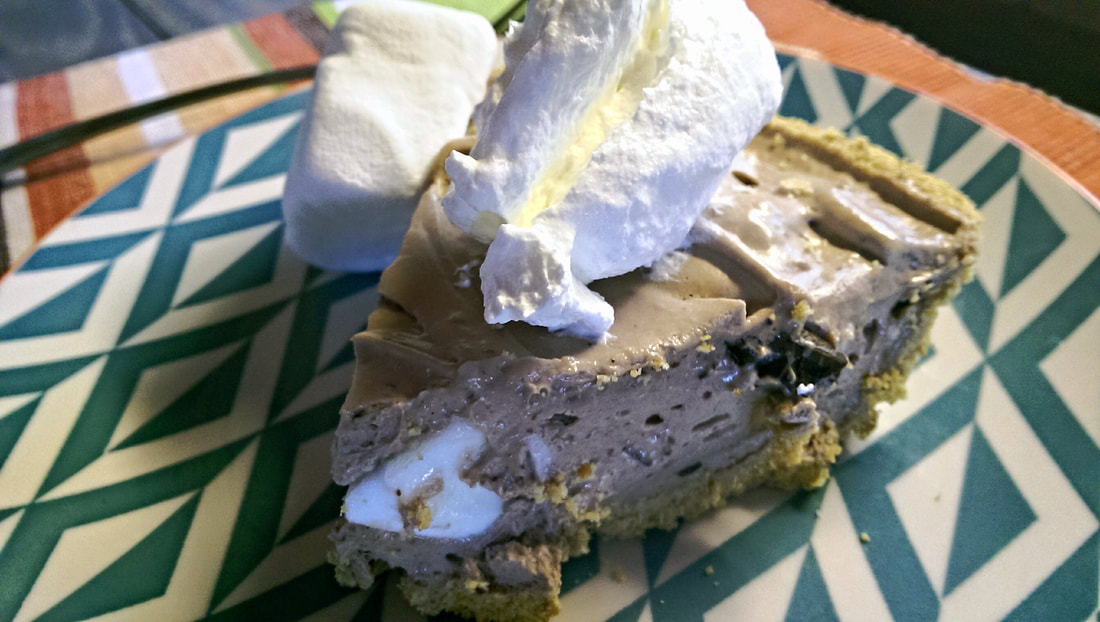 I wanted to make a no-bake cheesecake... ... that tasted like S'mores. So what I did was exactly that! This was a joy to make and this can be had all year round and it is easy as... well... pie! While I don't have some amazing story that comes with it, I thought I would at least give you a quick recipe so that, again, you knew I hadn't forgotten about you all. I made this pie back when the summer was just about to start and I had wanted to make some stuff ahead for the blog and just never got around to posting it until I remembered it was in my folder. I bought a bag of those giant s'more marshmallows and they are what actually inspired the whole blog to begin with. I even decided to roast the marshmallows to give it that toasty flavor and it was definitely the right call. It definitely tasted like a no-bake cheesecake and s'more's combined, and it was a delight to eat. RECIPE
 And then...
And that is it. This has a nice smokey flavor to it and it tastes nice and tangy from the cream cheese. Additionally, you could add flakes of salt but I don't think it needs it, as the acidity in the cheese does cut through the sweetness, as well as that pungent flavor of the dark chocolate as opposed to milk chocolate so it isn't overly sweet. You do not need to add vanilla since it is already in the marshmallows.
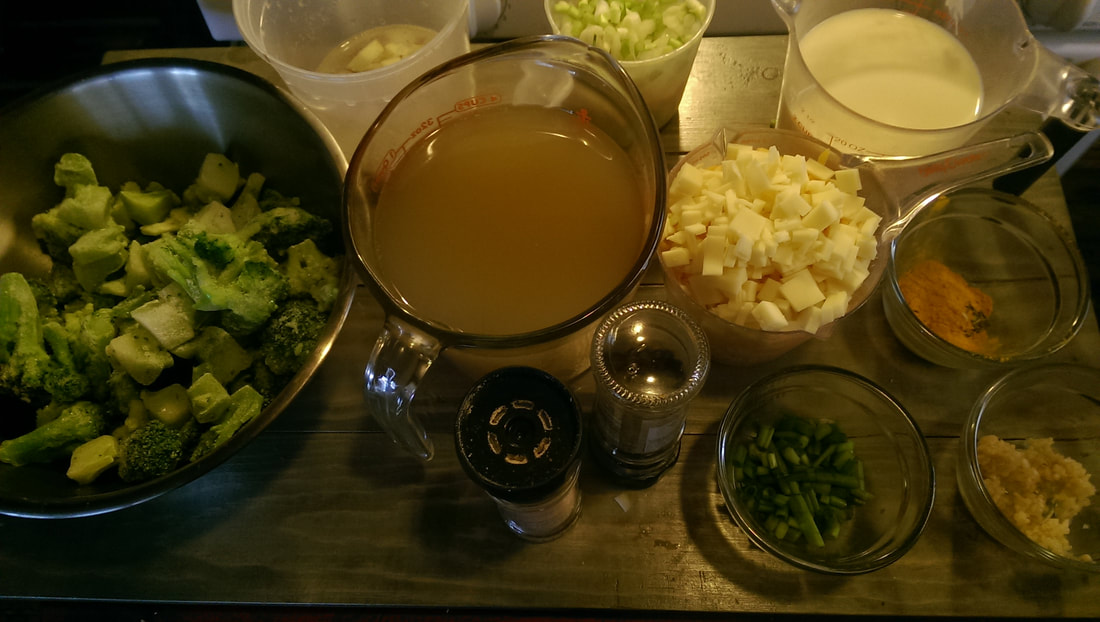
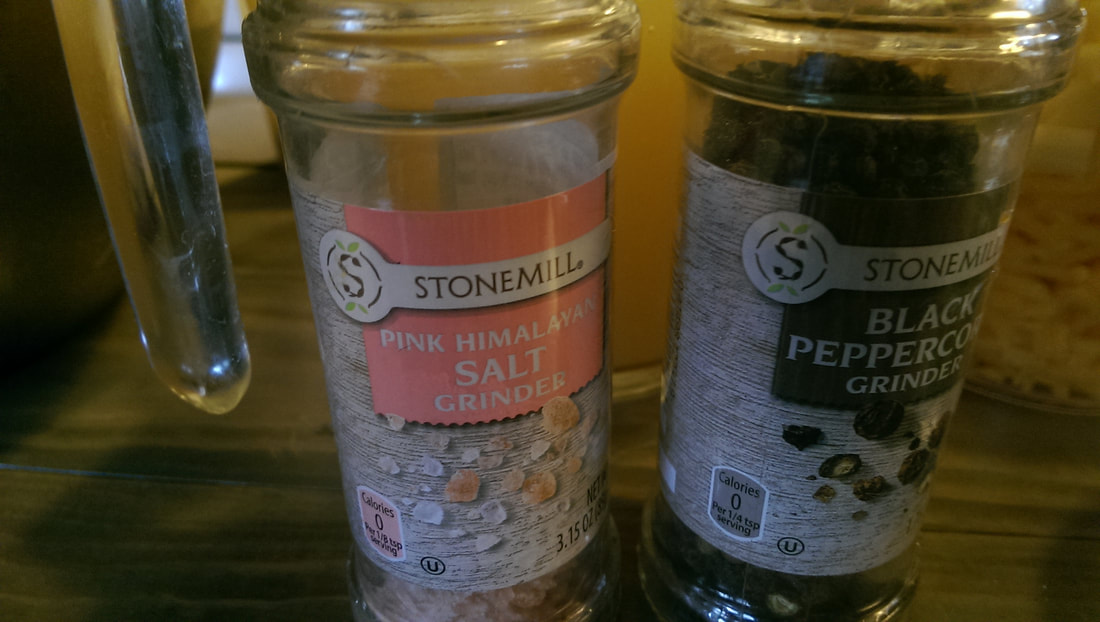
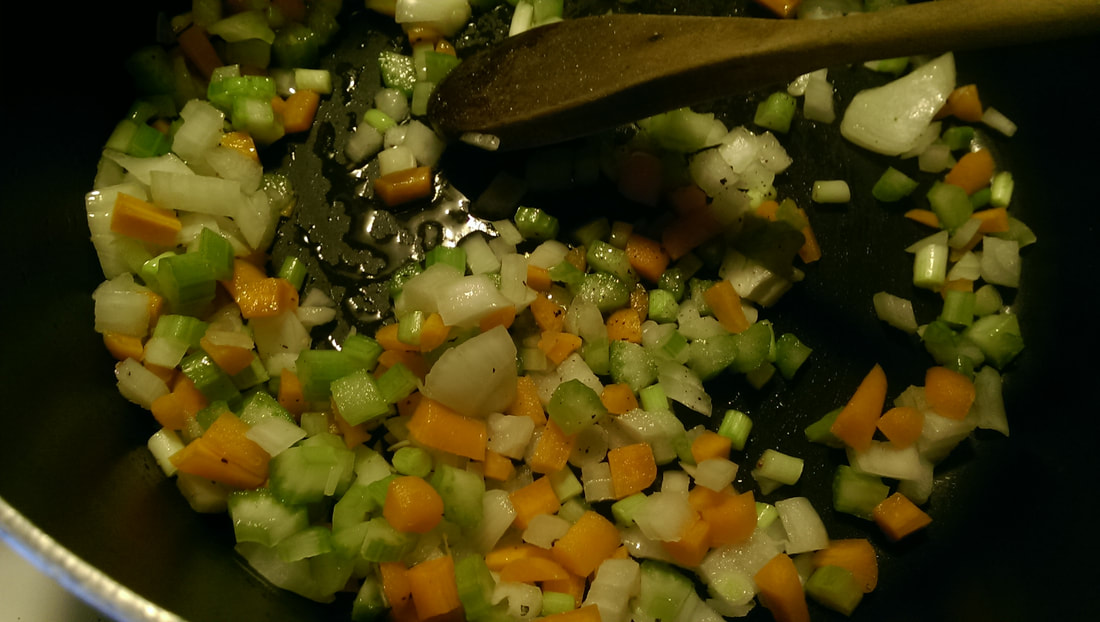
I hope you enjoy! I know this is another quickie! As always, happy eating, happy belly. 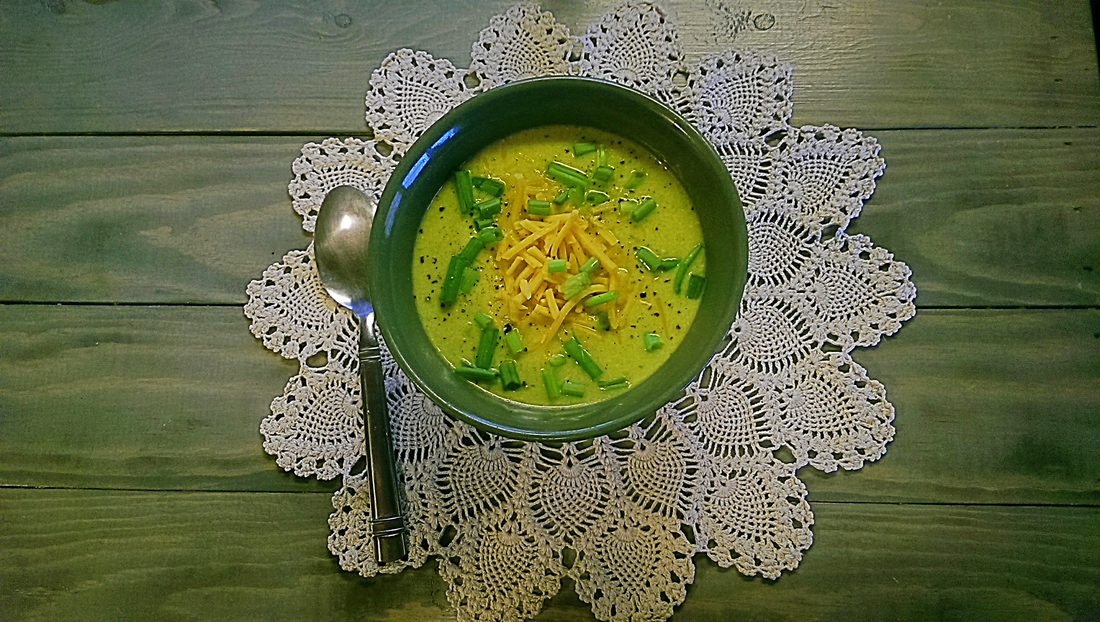 It's already cold in the mitten state.  It has been cold for the last several weeks and it is shifting into the time where making soup and stew is a weekly ritual. I happen to like a lot of different soups, but had been craving something I hadn't had in at least seven or eight years. Broccoli cheese soup is my absolute favorite soup for a few reasons... One, I love broccoli, and I love cheese. Two, It fills me up for a while. And three, it makes me warm when it's cold. I never really used somebody else's recipe because I thought it would be easy... I was right, but still, I should have looked at a recipe or two for some idea of ingredients besides the broccoli and cheese. To add cream or not to add cream? What cheese works best? Do I have to blend it? So many questions that I had in my head. I wish I had some kind of awesome story to tack on with this recipe, but I don't. This wasn't something from my childhood, just something I sampled from a certain bread restaurant that we all know, and I found it way too salty so I made my own. Simple as that. What else is there? So instead of a story about soup, I am going off on another tangent for a minute because I feel like the ending can be compared.  Right now, life is rough. You already know that I miss my dad and that I cannot say enough about that, but other things are happening too. Being an adult can suck sometimes, and right now, that is how I feel. I mean, we all get hit with it from time to time, and sometimes even all at once. For me, it's that every time that Bruce and I have something fixed, another thing is broken. Every. Single. Time. For instance, I swallowed my pride to talk to my mom about my car. I didn't exactly ask for money because I don't feel right to, but I did gripe about it. She gave us the money, and we got all the big things fixed that needed fixing; the muffler, the suspension, and some other important things that make the car safe to drive. We get that fixed and it's running great! I mean, there is still a little work left on the muffler, but it's so much better and we can actually hear ourselves think when we're on the highway, and relax instead of having our hearts in our throats in the hopes of not being pulled over for noise violation and get slapped with a ticket. All of that is great, right? Hallelujah! (FOREVER GRATEFUL!!!) But then, bad news comes. "Hey, my uncle is in a coma, we need to come to the hospital." -- That was the day before my birthday that we went. "Hey, let's take you out to eat." Can't enjoy my food, dad isn't around to call and wish me a happy birthday, Bruce's uncle is on HIS way out and reminding me of Daddy, and then all kinds of little things: the water pressure being out of whack, not getting a hot shower and only getting cold bird baths from the sink... Stuff clogging, stuff breaking... People asking for money you don't have and you feel like a terrible person for letting them down. You start to wonder why on earth it's all happening at once and just want to yell at the air for being polluted. And then you get a reminder of little things that don't suck. Being hugged by your spouse and cuddling up while asleep because the weather is cold, wrapping up in an afghan your late grandmother knitted because it's like being hugged, and eating a bowl of soup because it is also like a hug. That is why I wanted to make soup. So I did... Life is not all peaches and cream, but you can still dream of the cobbler they can make. 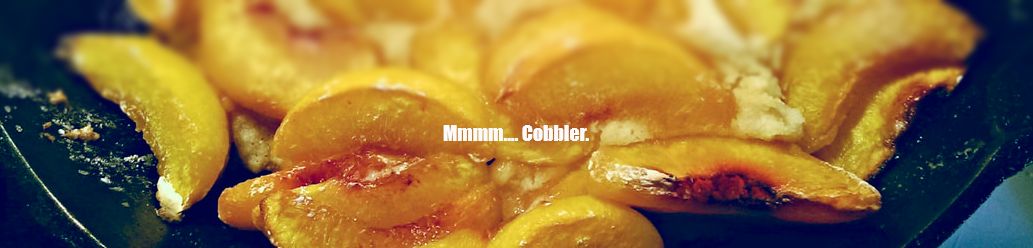 Gluten Free Cobbler, Click the pic for the recipe. This is not diet food... But it is healthier than it could be. 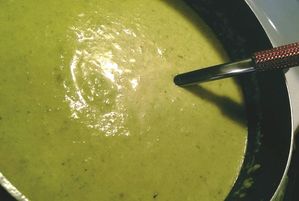 I want to preface this recipe with a few things... First, I wanted to make it gluten free and not use a roux as a thickening agent. Two, I wanted it to be a little easier... Three, I wanted it to still be creamy, but I didn't want to add heavy cream. Little changes! The Recipe
Putting it together...
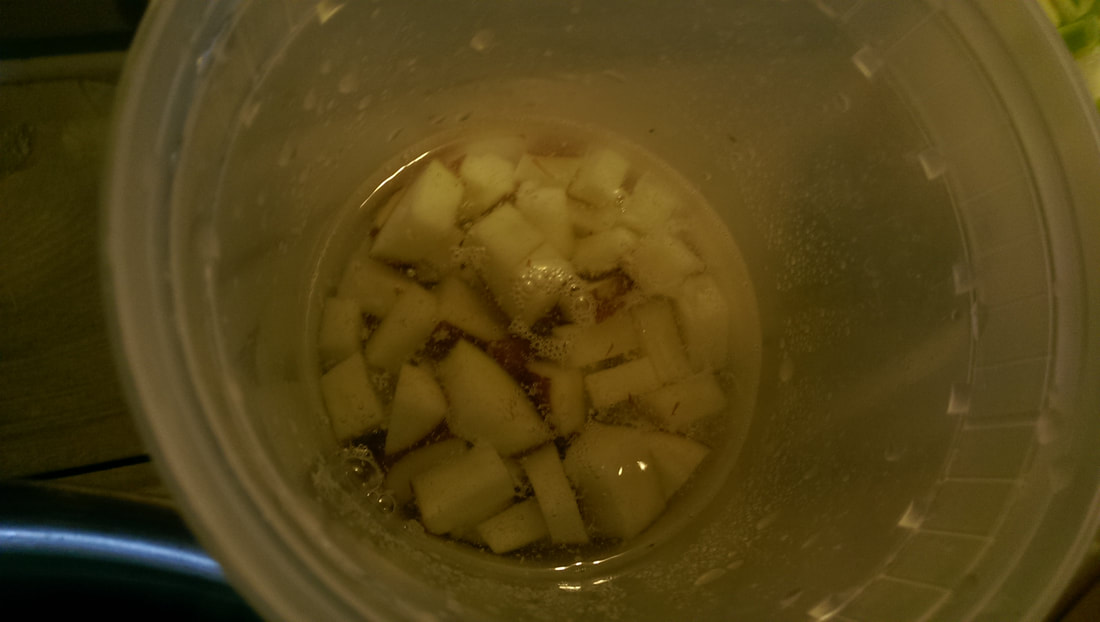
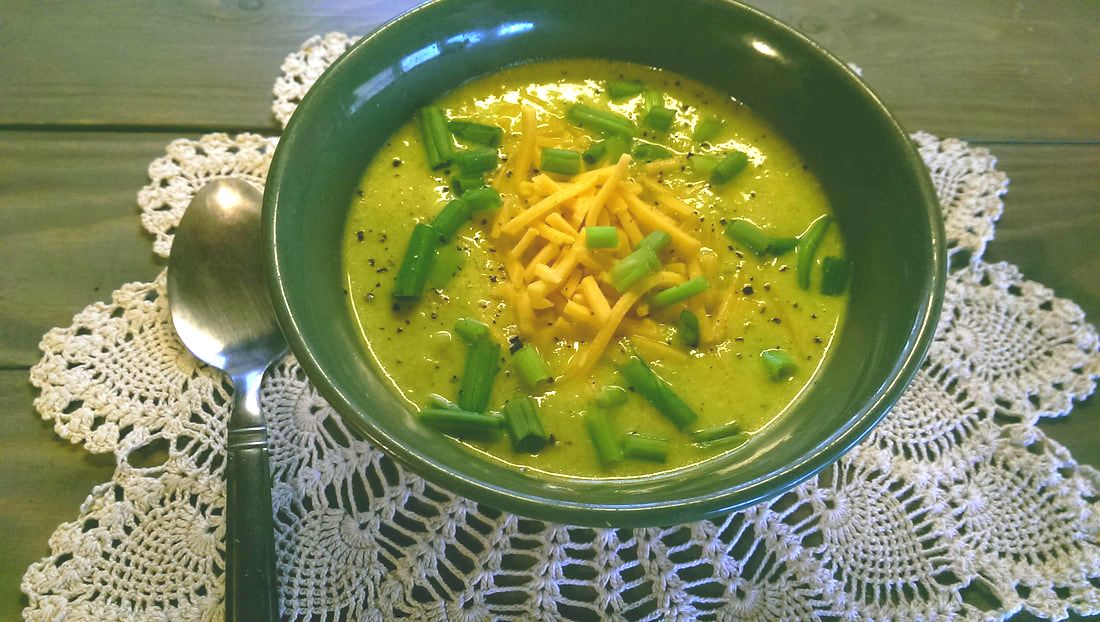 Okay, potatoes? Yogurt? Yes... You read the text right! First, the taters... The taters replaces the starch that the flour in the roux would have given you, which helps the cheese to bind into the soup. I tested this out because I would like to pass it on to those who are on a gluten free diet can enjoy it too. (See, I DO love you. :P) The greek yogurt is because I put sour cream instead of heavy cream, and I wanted that tangy flavor. The creaminess of the yogurt makes it more decadent. I loved it with the changes! I can honestly tell you that it still filled me up, that it tasted great, and that I couldn't even tell there were potatoes in there. The only reason I cannot call it diet food is for the fact that cheese is pretty fatty. But you CAN cut down on some of the fat so you can feel LESS guilty, and still feel like you did nothing out of the ordinary to your soup. I normally don't use turmeric in my broccoli cheese soup, and that also helps because it enhances the flavor of the broccoli in all the right ways. Some updates and other Stuff!
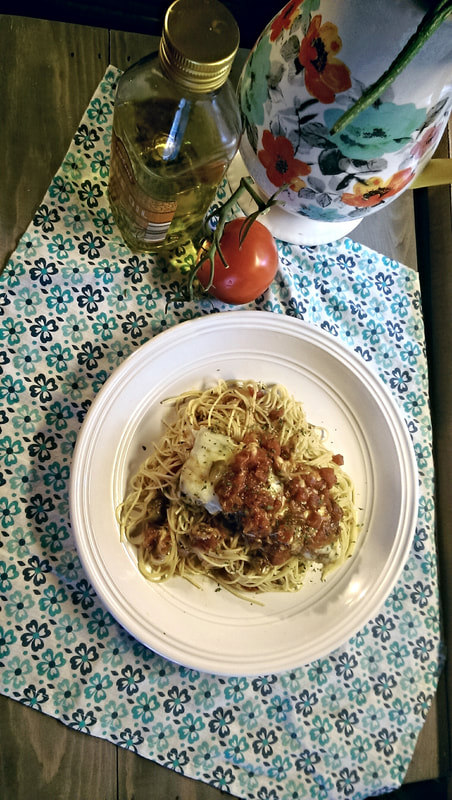
And that's all she wrote.  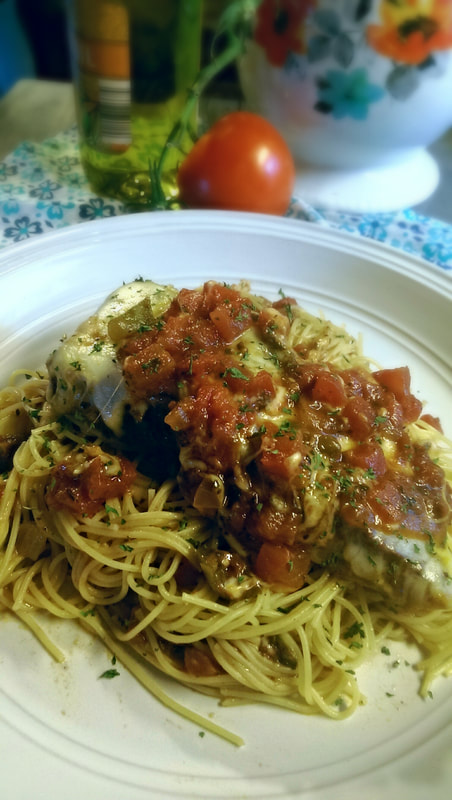 Marie Barone isn't the only one... I have been holding onto a secret for quite some time… or rather, secret recipe. Did you ever watch the show, Everybody Loves Raymond? Marie Barone was one of my favorite characters. I mean, she could cook some beautiful foods, though she was very secretive of this. One recipe in particular got my gears moving and my curiosity on high alert. It was steak pizzaiola, a name that I memorized and thought about quite a bit. Carne Pizzaiola means “meat in pizza style,” and is mostly made with cheaper cuts of beef, but can be other meats such as chicken. Basically, it is a wide range of combinations that you can use. The best way to put it is that the meat is a replacement for pizza crust. I have no idea on where in Italy this dish was first made, or even when, but I thank the Italians for such lovely fare. I decided to look a recipe up and you’re probably going to giggle at where I found it at… I hijacked Martha Stewart’s recipe for her easier version (she has both that and traditional). I made it the first time several years ago, but right away I decided to change what I saw because her recipe seemed so… well… herbless? She was using round steak, which is quite lacking of flavor to begin with, and there wasn’t much in the way of even Oregano. I don’t even remember if she used it or not. I thought about how I like my pizza in general and went for it. My family gobbled it up, including my very picky dad who didn’t like flavor much (aka, he had a bland pallet, the poor man). Guess what? It’s actually very easy to make, and you don’t even have to tenderize the meat because it’s a slow cooked, one pot/pan meal! The Recipe
The Method
Totally optional but worth it, refined method:
Serve with pasta or bread if desired! Note: I omitted the paste because that is how I like the sauce, so it might look different on my plate than it will look on yours if you use the paste.
The best part of this recipe is that you can play with it, adding what you like on pizza. If you are so inclined to add mushrooms, or other meats, or what have you. I like to keep it simple, closer to traditional. If you use a different meat, your cooking time might change, Chicken breast is better added back into the pan close to the end of the sauce cooking so it doesn’t dry up, chicken thigh would probably work better. Funny Story... Funny story about a different protein that I used once for this recipe… My dad absolutely loathed venison. He swore up and down that he would be able to tell if it was deer or not. My sister asked me to cook dinner for a Christmas gathering, perhaps a few years back, knowing that dad would throw a fit if he knew it was Bambi in the pan and not Heifer. Challenge accepted. I made one of my best batches of pizzaiola that evening, making sure I was there before everyone else so dad wouldn’t see the venison before it was cooked. It turned out so tender and delicious that dad ate seconds… I had fooled him into eating deer meat! When I told him a year or so later that we fed him Bambi, he said, “I knew it all along,” in that tone of voice a kid gets when they find out they’ve been duped. And I laughed and laughed. (I kid) With that all being said, I bid you good day and:  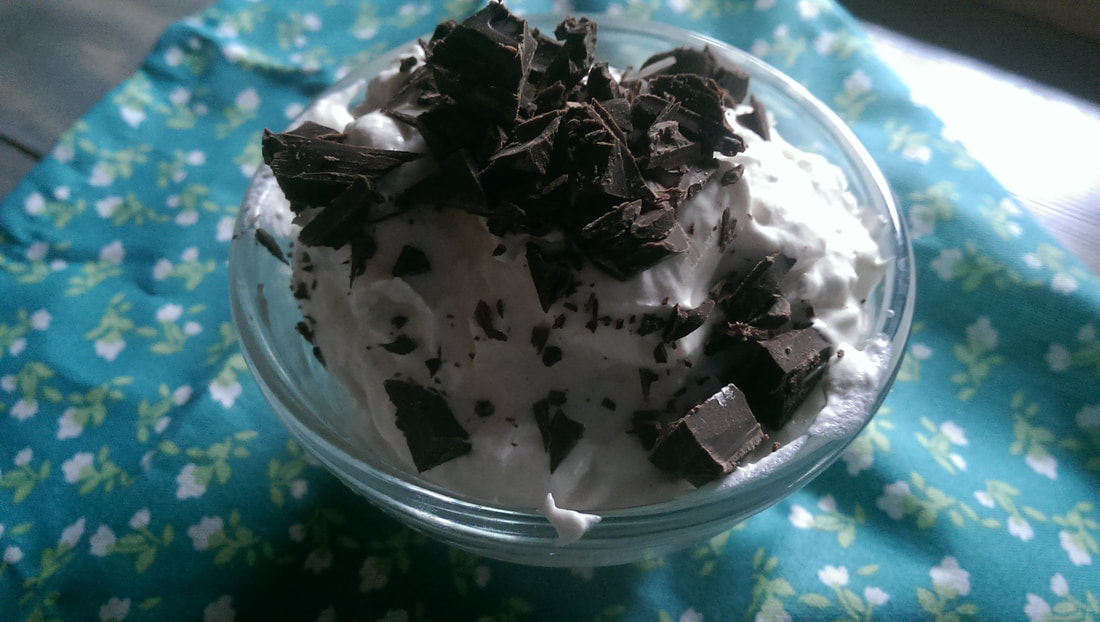 Mothers Day was yesterday; my sisters and I wanted to do some things that were special for my mom, given that it's been a rough time since dad left us. We put together a brunch and my older sister asked me to make something to bring, and one of mom's favorite things that I make is an easy chocolate mousse, or what other people would call a whipped dessert since it isn't traditional mousse. I was going to make a strawberry sauce for it and maybe some other fruit, but my strawberries were freezer burnt and my plans had to change. I remembered the bananas I had sitting around, all ripe and brown looking in their overly sweet glory. I remembered that my mom liked banana pudding, so the bell went off in my head: I would make banana mousse and I could put the chocolate in as chunks, which would make it appropriate for a brunch dessert after all. Before I get into the recipe, though, I want to talk about my mom. My dad was not the only person who contributed to this passion of mine, it was my mom that taught me a few basics like boiling water and making boxed foods like mac n cheese, or spaghetti. The story she told me about her own cooking was that she wasn't a very good cook when she was first married to my dad, but she never really said that was why she was teaching me some things. She did the best she could at the time, but it was hard for her when dad had gotten sick from driving truck and could no longer work. She'd work rough hours at a nearby nursing home during second and third shift, thus leaving my dad to do the cooking while she did everything she could to keep food on the table. I remember how she would buy a lot of pork chops because those were some of the cheapest, and a lot of ground beef for the same reason, but she didn't get to eat them with us. Mom told us later that it was really hard for her to keep the hours she did because she missed her babies. By the time she got home, she was asleep, she couldn't see us off to school, and she didn't g et to see us much at all during her second shift job. Finally, she decided to go to school to better her life as well as ours, was able to get a better job with better hours and we were able to eat better food. Needless to say, I appreciate my mom's role in encouraging my knowledge of cooking and being supportive of me when I decided to go to culinary school. Mom, I hope that you read this because writing out my feelings tends to be much more eloquent than my sometimes stumbling words. More about the dessert 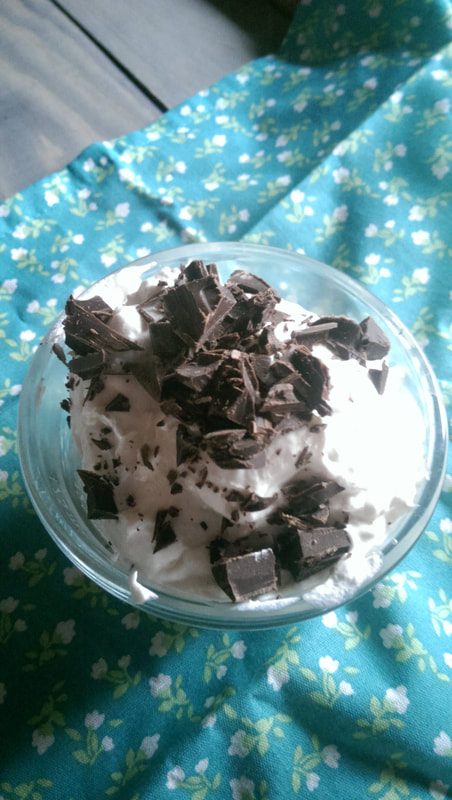 This dessert is so very easy and delicious that you might be surprised. The secret to making this non traditional mousse is cream cheese or Neufchatel instead of gelatin, which not only gives it the thickness it needs, but it adds depth to the flavor of the dessert. The Recipe
The Method
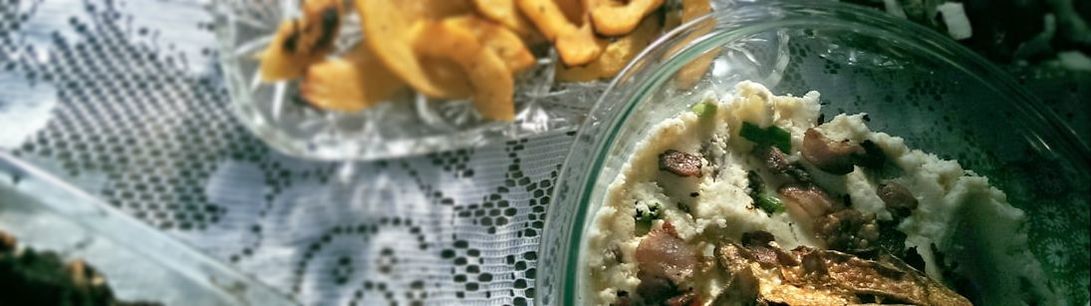
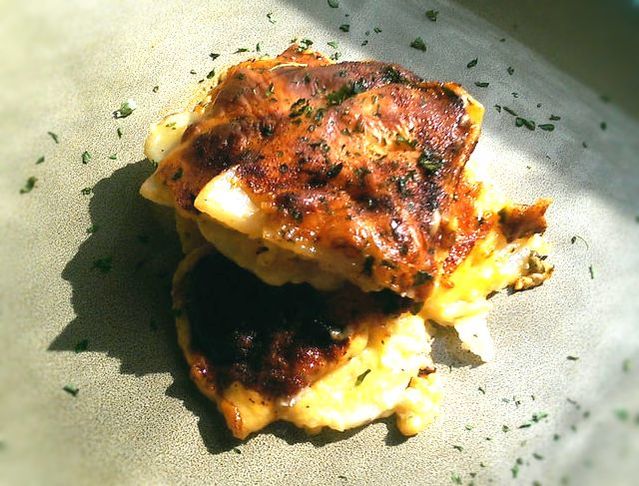
 The end result is something wonderful... If you are a fan of bananas, anyways. I absolutely loved the texture it had after it chilled overnight. You can, in fact, freeze this one and make a lovely ice cream of sorts, it is that velvety. The flavor of the bananas is subtle after only an hour, and stronger overnight. The dark chocolate balances out the sweetness (No added sugar, by the way!) to the dessert and makes for a rich flavor combination. Fair warning, it's not quite diet food either, but a little bit does go a long way. Speaking of Bananas! I am pleased as punch to update you on QDFoodie's cute kitchen food. The kick starter campaign is now in full swing, and they could use some help from friends all over to make their dream into reality. For as little as a $2 donation and simply spreading the word through social media, you will be a big help. You could end up with a gratitude gift of one of my favorites out of this collection, the banana measuring spoons that are both metric and standard, as well as in braille. These wonderful tools are for a good cause, helping kids of all sorts to develop a love for cooking as well as adults who happen to like cuteness such as these. I am looking forward to testing these babies out, and you will help make that happen. Be sure to check them out at their Kickstarter Campaign!   Yesterday was grand, a quiet Thanksgiving spent at home with my husband. I had a chance to contemplate many things that I am thankful for. My list is quite long, so here are a few things: I am thankful for my husband, who has been a cornerstone for me in the rough times of illness. I am grateful for my family and friends who have been patient and understanding, and stuck by me even when I was grumpy. I am grateful to have a roof over my head, food to fill my belly, and clothing on my back. And finally, I am grateful for being able to write these blog posts for my friends and new readers, who drive me to keep going when sometimes it's very hard for me to do so. Thank you all. This year, I finally got to give my husband a feast made by me for Thanksgiving. I know it's not just about the food, but food is a good chunk of it and it was important to me that I get to do this special thing for Bruce. Add to that, but I saw an opportunity to develop some recipes for this blog and test them out. I have at least four recipes, maybe five, that I am going to share with you in no certain order. I have plenty of material to work with that, depending on how I feel, I will be able to share them with you at least once a week or so. Plus I have two other blogs planned involving my readers, and one about pantries. I decided that this year, I would prep for two or three days before the big day... I must say that it was probably the best thing I could have done for myself. I had almost everything at the ready by the time Thanksgiving rolled around, and it was the easiest Thanksgiving I have ever dealt with! I made at least twelve things, two of which were unplanned. My challenge to myself was to use as many ingredients as I could that I already had on hand, and spend as little money as possible for the rest. I spent around $25 when the whole feast was worth at least $60, if not more. Here was my menu (Recipes planned for the blog**): Turkey with gravy Pumpernickel and Walnut Stuffing** Classic Green Bean Casserole Deviled Eggs Banana Bread Roasted Squash and Seeds Roasted Brussels Sprouts with Italian Cheeses Goat Cheese Mashed Potatoes with Bacon and Scallions, garnished with fried potato skins** Cranberry Apple Relish** Sweet Potato Cheesecake with Marshmallow Mousse** Pecan Pie (Frozen, not going to lie.) Home Made Bread Rolls Crescent Rolls Today's recipe is going to be the mashed potatoes. I ended up loving this one the most out of everything! They were creamy and delicious, with a nice tangy note from the goat cheese, and they held up well to the gravy. I also plan on making a leftover reboot out of this one because I can't stand eating leftovers with the same flavors day in and day out. Fair warning, there are lots of steps/dishes involved, and these spuds are rich and decadent (aka, not a diet food). I will include lighter options in the notes. With that in mind, proceed :) 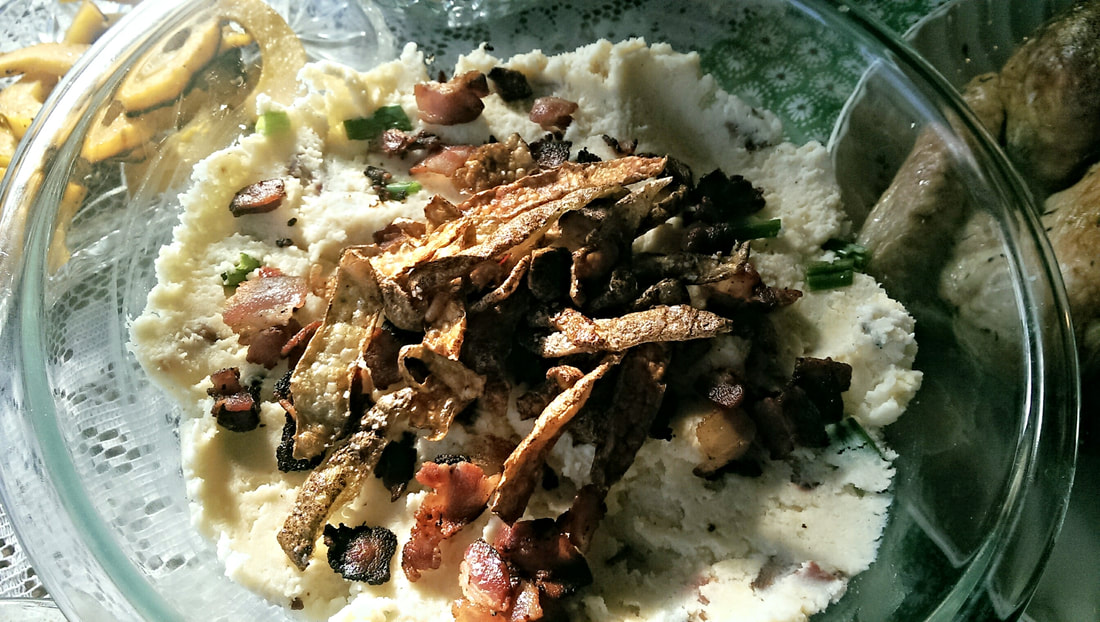 THE RECIPE
MISE EN PLACE Everything in place
 COOKING
 EnjoyI have a few more recipes up my sleeve for you, and I hope you enjoy this one in fellowship with your friends or family. If you have any comments or questions, do let me know! Feel free to send me pictures of your creations using my recipe as a base. I would love to post your pictures and shout you out.
Happy Thanksgiving! Love, Kimmie 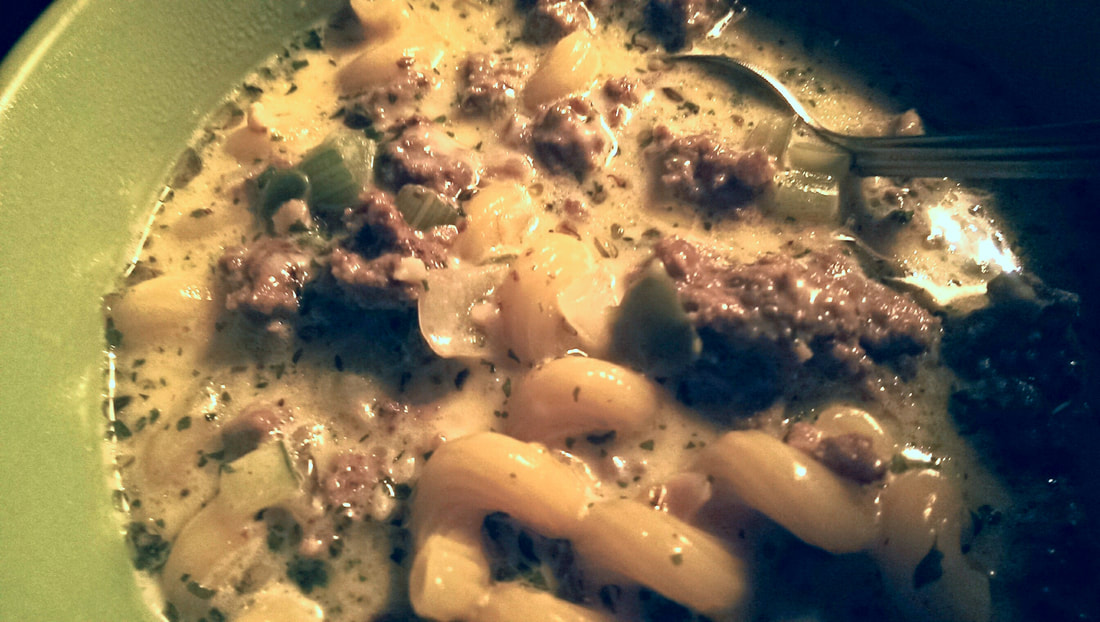 I am one of those people that eyeball things that sound odd or off putting to me. For instance, pumpkin spice might be good in my coffee (I honestly wouldn't know) but it would not be good, at least in my mind, in my chocolate pudding or some such. When I first heard about Mac n Cheese soup, there was a big part of me that was turning my nose up, and the kid in me who liked her Kraft to be soupy even though that was not how it was supposed to be made was all like, hell yes! So I thought about it, and I decided I would give it a try. I wanted it with more stretch, however, so I got the idea to add some burger into the mix because, why not? People make chilli-mac and cheese burger mac, why not go ahead and put some burger into my soup? So I did, and I made the right call. The soup was very delicious, and my husband liked it so much that he ate three bowls. That is a compliment because he's such a picky eater. I had the urge to throw some broccoli in because, hello, broccoli and cheese soup... But I resisted, and that was also the right call. I wouldn't eat broccoli with a hamburger, so why would I put it in a soup based off of such? I would, however, eat it with some sauteed green peppers, so that is what I did instead. As usual, I looked around the internet for recipes, saw a bunch, and then decided just to do my own spin which I am sharing with you. Just like in all recipes that I post, I think about the flavor profile... What can I do to make it better? For instance, I didn't really look for a Mac n Cheeseburger soup, just mac n cheese soup. I threw the burger in because I thought it would stretch it along and make it taste good. I was right. Here is my take! THE RECIPE
THE METHOD
I apologize for the lack of visuals, but I hadn't actually planned to blog this one. I wanted to try it before anything, and seeing as it was delicious... Well, here it is. I hope you enjoy it as much as I have!
-Kimmie 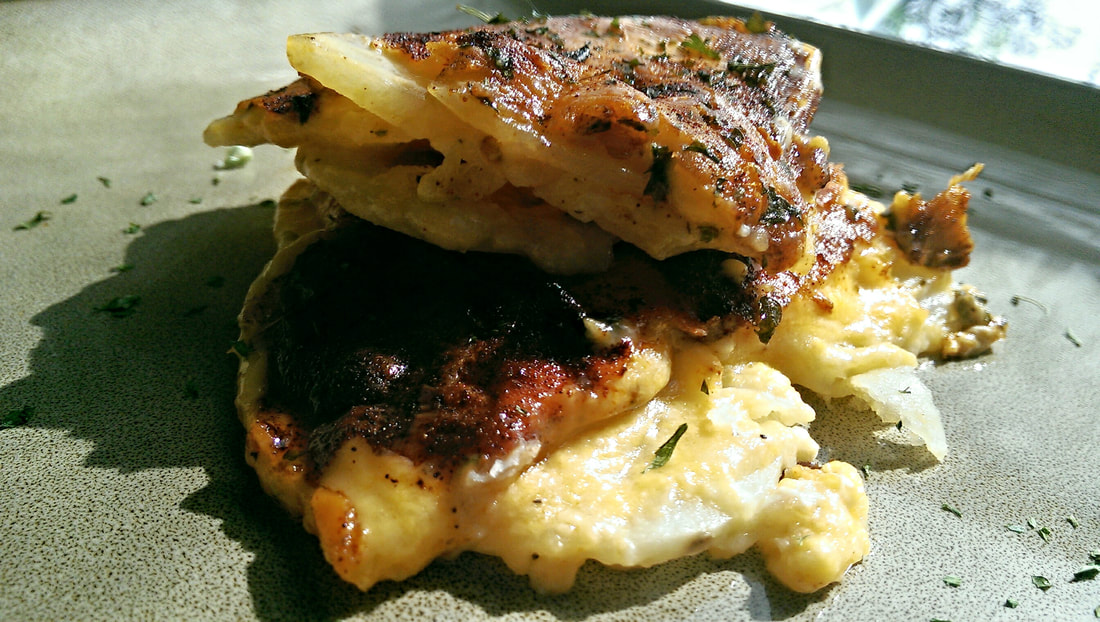 Back when I was a little snot, my mom used to make cheesy potatoes, which, of course, was a hit. That is... unless she called them "au gratin," which would cause my sisters and I to recoil with horror and yell out, "ALL ROTTEN POTATOES! EEEEEWWW!!" Seriously, we thought our mom was talking about rotten potatoes, so she started calling them Cheesy Potatoes, which other people call them too. Later in life, she told me the story of how we used to react and I still find it amusing to this day. In fact, yesterday when I took my taters to potluck, I had to laugh because my brother in law teased me and called them "Potato's All Rotten," and I explained that was what I used to call them. Apparently, it has been a nickname through many generations where kids would call them "All Rotten" and such, at least in our family! Now, I don't make these very often because peeling almost a whole, 3 lb bag of potatoes for this can be tedious... Add to that, there is a lot of love you need to put in the dish. The dish is totally worth all the work, so every now and then I will get a bug up my butt to do it. This time, it just happened to be that I had an invitation to a potluck, pretty much last minute due to certain circumstances, and I didn't have money or time to plan something out. I had planned to make these potatoes for my birthday because I have been craving them, but I can do something else to go with that particular dinner. We've all been there, last minute invitations or unexpected company coming over and you need to whip up something awesome but don't have cash or time to think. Potatoes are a pantry staple, and cheese... Well, I always have cheese, but I don't know about the rest of you. I told my husband that whatever cheese we had left (block and shredded) would be for this, and then the potluck came up. I spent an hour on prepping and another hour at home just to bake, a half hour to set, lastly, another bit of time to heat back up (although, they would have tasted okay cold, just sayin'.) So I spent 3 hours making them, and they were nearly gone in fifteen minutes. I guess when taters are good, they are good! Before I get to the recipe, let me warn you that although my recipe is reduced fat, it is still not diet food and you should proceed with full disclosure. Normally, they are made with heavy cream and butter, and my recipe does not use either, yet they are still pretty fantastic and rich enough without them that I am sure you wouldn't miss those things. THE RECIPE
THE METHOD
 It's such a comfort food to eat, and it is one of those things that you know everyone will eat unless they can't do dairy. This dish is great to serve with pretty much any protein, and could even become a main dish when you add a protein. I would suggest bacon or ham, though roast beef would work lovely as would roast chicken. Broccoli would be awesome as a veggie to go in there (or cauliflower)... I am sure that peas would be pretty good too. It is up to you, really! With the richness of the cheese, you definitely won't miss the heavy cream and the butter if you are looking to cut at least a little bit of fat out. The great thing about potatoes is that they are better for diabetics to eat than bread and rice, though you still want to eat in moderation because of all that cheese.
I had a lot of fun serving this to my family last night and was delighted at how quickly it was eaten. I hope you enjoy this recipe too! Happy Eating, my Foodies, --Kimmie |

The Eccentric Foodie
Food Tip
Cooking bacon in the oven is the easiest way.
Recipes
These are various recipes that either I created, or I found and adjusted to what I thought would be awesome or even healthier. Archives
March 2020
Categories
All
|


 RSS Feed
