
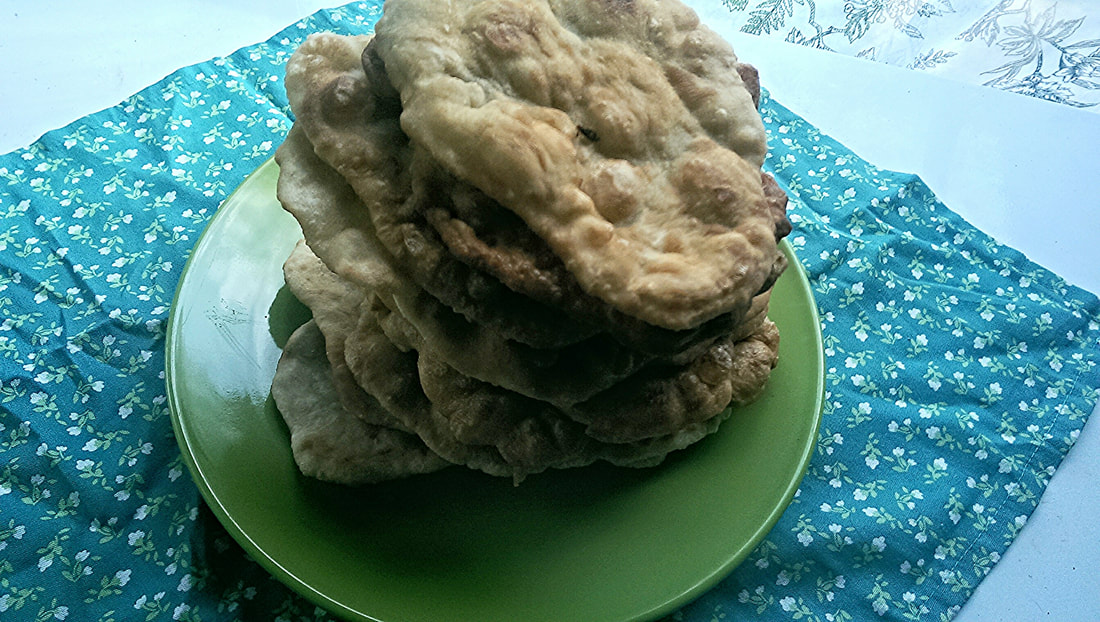
 I had always wanted to try making Navajo Fry bread because I wanted to pay homage to the Native American tradition. I have a great respect for all tribal traditions as my great grandmother was Native (I was told Sioux, though I think if the location has an influence, she was probably Potawatomi or Miami). I have always been fascinated by what I have learned throughout the years about the practices of the Native American, from how they dressed to how they respected everything around them. For instance, when they made a kill, they would utilize everything from the carcass, from the entrails to the bones. There is a certain degree of spirituality to everything for them, cooking was not to be left out of this equation at all. Fry Bread was borne out of pain and sorrow, and some people treat it as sacred. When I was cooking it earlier, I tried to keep that in mind and treat this with love and in the same respect. It isn't just a novelty experience for me, it really was a joy to me to do this and it really did affect me as a descendant of the Native American; I truly hope that I have done justice and given the proper respect to this. Here is an article I think would be beneficial for you to read if you are interested in the history of this food, it is far more eloquent than I can convey in my own words. Right now, I feel like I am on my own spiritual journey... Food is a big part of it for me as I delve into the different parts of my heritage and family history. I have shared with you things that have directly influenced my life as a person. I have said time and time again that food is a universal language, that you can convey messages through the sharing and the fellowship. This is the reason I do these blog posts... I want to share this part of me with you. As far as the recipe goes, I am not sure this one is the traditional recipe because the link above says there is yeast and sour milk included in the ingredients that were available at the time. I do recall being confused that there wasn't yeast involved in the recipe I did use, but it still turned out to taste really delicious and tender. I am sure the sour milk would have given it a flavor that it didn't have, however... But the recipe on that site is very close to the one I used, though mine had no milk involved at all. Before I take this post any further with more food for thought, here is the recipe I used for my Fry Bread: 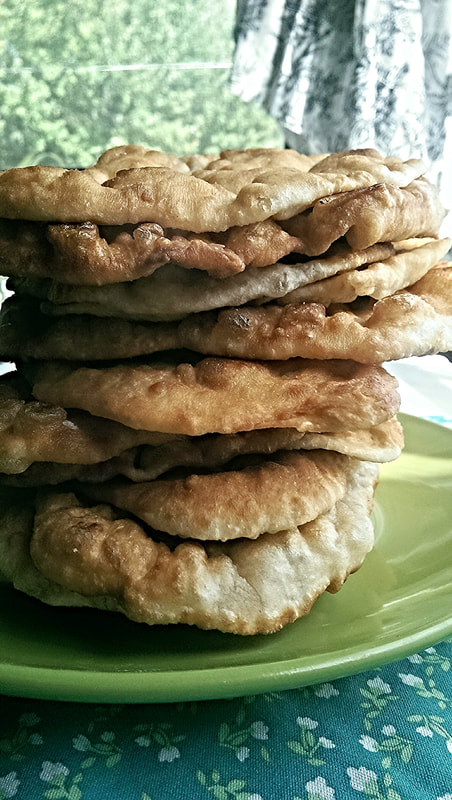 FRY BREAD RECIPE
THE METHODCombine all of your dry ingredients into a mixing bowl... You do not need to sift but it won't hurt any if you do. Add your wet ingredients and mix well... I used my floured hands because it's part of the experience, but you can use a utensil if you prefer... Mix well, but do not knead, to form a ball. Cover the top of the bowl with a damp towel, the lid, cling film, or a plate... and let it rest for two hours. After it rests, prepare your area to roll the dough by dusting with flour... dust your rolling pin as well. Pinch off golf ball sized sections and roll thinly. Preheat your oil, you need enough to cover the top of the bread... I used an inch but recommended is two. Fry your bread, flipping after about two or three minutes... Then let it drain on a cookie rack. Serve while still warm for the best experience. You can put taco meat (pork or ground beef), tomatoes, and lettuce in the shell to make Indian Tacos. I can honestly say that this is now my favorite way to eat tacos as of yesterday. I do suggest that you eat the bread on it's own first because there is something really special about doing so. 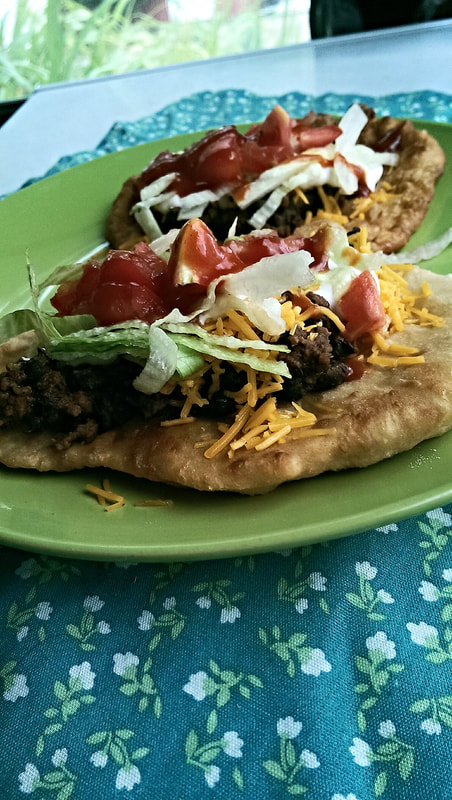 FRIED BREAD: HOW IS IT DIFFERENT THAN FRY BREAD?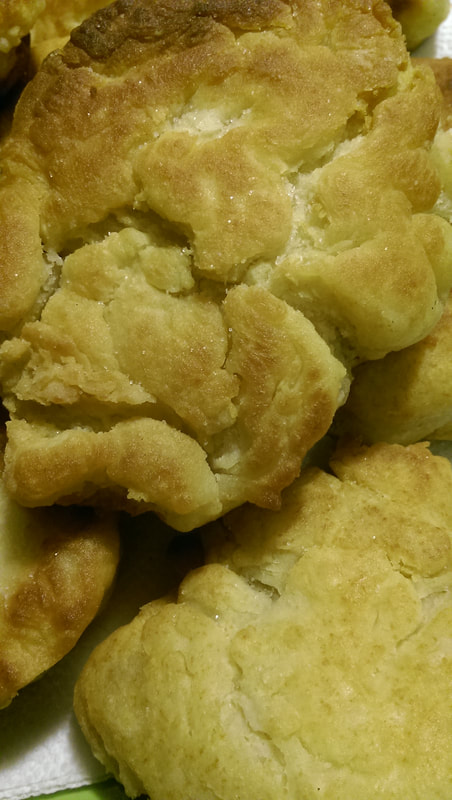 In searching for information about the history of the fried bread as opposed to fry bread, I ended up not finding very many links when I tried to Google. But I do know a few things about it from when I first made it, and I also asked some questions to my good friend, Becka, who helped me out with some of the information. Fried Bread is a descendant of fry bread, yes, in tradition but not so much in method. While Fry bread is a flat bread that started from rations they were given during a time where they were being pushed from their lands, Fried Bread kind of evolved from this with a shared history but is more of a fried biscuit. Fried bread started, most likely, in the Appalachian mountains when the Natives took refuge with white settlers, so it is also based off of a rough history. We also know that fried bread was a staple during the Great Depression because of how easy it was to get the ingredients and how you can feed a lot of people with it. The fried bread that I made several months ago was made with my drop biscuit recipe, but the traditional recipe is a lot simpler than that even. Here is a recipe I found today. Fritters - Another Type of Fried BreadBecka pointed out to me that I should not forget to talk about fritters, which is.... also a fried bread. Generally, a fritter has the same consistency as a drop biscuit with whatever chunks of leftover foods (corn, apples, zucchini, etc) they would eat and is served both sweet or savory. Corn fritters are made with maize or corn meal, while other fritters tend to be made with white or wheat flour, and they are either deep fried OR pan fried. Corn is used a lot because it is indigenous to the Americas and the Natives had access exclusively to this plant before European explorers took it back to Europe with them. They would grind it up to make the corn meal (maize), and also use pieces of corn in their fritters. It is made with corn meal or flour these days, but the premise is still the same. While I have not made fritters, I have eaten fritters plenty of times and I am happy to eat them occasionally (I try not to eat any of these foods often because of my blood sugar), and they are quite delicious. This is why we have an abundance of glazed apple fritters in bakeries across the United States. Fritters are made throughout the world, of course, but I am not exactly sure where they first came from. However, the American Fritter is definitely laced with tradition as much as Fry Bread is and I think it should be respected in the same manner. Here is a recipe I found on Fritters, with some history about them, do check it out. 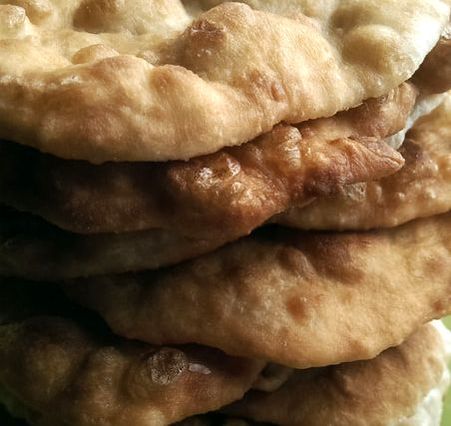 I had a lot of fun making this food, learning about the history of it and the other foods that stem from these. I hope that I have helped to bring some insight into this traditional food! Please do try making these and share them with your family and friends.
This is an ultimate food of love.... Enjoy, my foodie friends! Love, Kimmie 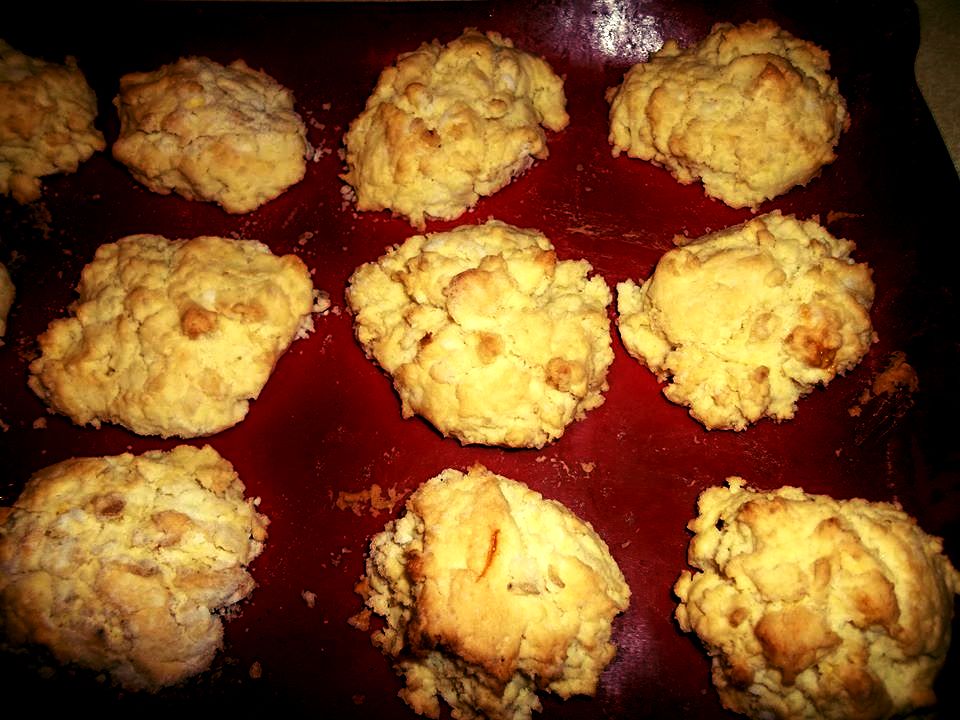
Warning: This recipe is buttery! This is not diet food. Proceed with full disclosure!
I promised you biscuits to go with your gravy, right? Keep in mind that sausage gravy 'n' biscuits isn't exactly for those who are watching their waistlines... But you are missing out when you ignore a fluffy biscuit, and the gravy that goes with it. This recipe is something I use for dumplings as well. I like my dumplings to be fluffy, like a cloud. There is an art to making both cut biscuits and drop biscuits... The butter (or shortening if you must use that), the amount of flour you use, the seasoning, and the amount of time you work your dough/batter. But the great thing about the drop biscuits is that you will know just by looking at it if it is too wet or too dry, if you did just the right amount of mixing, etc. It's more of a "fritter" style, though not fried, than the flaky style. I don't have this awesome, nostalgic story to tell you about what made me like drop biscuits... I just like them. I like how soft and fluffy they are, and how they are the perfect vessel to hold sauces and gravies as there are so much more nooks and crannies to speak of. That is not to say that I dislike the flaky style biscuit, those have advantages too! But I am saving that recipe for another time. This one will have a few alternatives to flour, milk, and butter, for those of you on gluten free, dairy free, or vegan diets! First, the recipe. 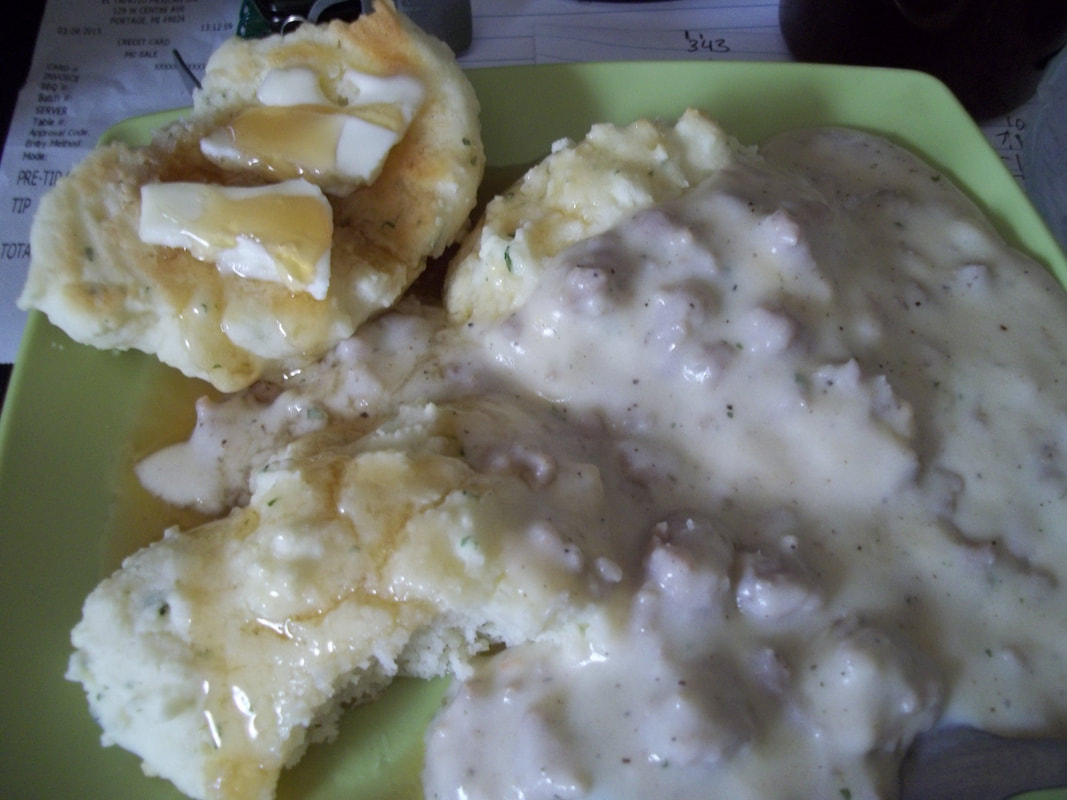
The Recipe
The Method
Preheat your oven to...
350 F or 175 C
In your mixing bowl...
You can sift your dry ingredients in if you desire, but you can just put them in.
Add the melted butter...
Cut it in with a fork or pastry cutter. It should look like wet sand when you are through with that.
Add half of your milk all at once...
Mix and keep adding until you have a thick batter that hold's it's shape when you have it on a fork or spoon. Do not worry about lumps, lumps are good. You do not want to over-mix or your biscuits will be chewy!
Spoon into 1/4 cup- 1/2 cup lumps onto your sheet pan (Greased if needed)...
Bake for 12-15 minutes or until you see nice brown bits on the tops!
Substitutes and Add ons!
The reason I don't have a set amount of milk or flour is that sometimes it varies on how much of each you need. This recipe is super forgiving unless you overmix the dough! Just be careful not to mix too much if you have to add flour or milk.
This recipe is super easy and versatile, which is what I absolutely love about it. They taste really awesome in a stew, as a dessert, or used for sausage gravy. I hope you enjoy as I do. Let me know what you think! Hit that "Like" button, share it, love it, eat it. Thank you, foodie friends!
Much Love, Kimmie P.S. See that "Yum" button? If you have a Yummly account, please do tap that button! 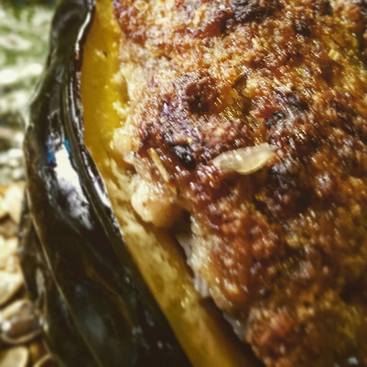
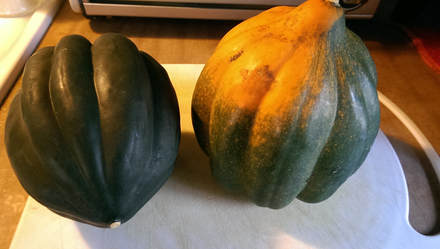
This is a story that started off with a broken oven, and a husband issuing the line that he doesn't know is a challenge to his wife, "My mom made it this way." That's right, my oven did not work, and somehow, I was supposed to roast a few acorn squash for supper one day, and he had to go and tell me the way his mom used to make it... Now, I don't know about how you would have felt being issued such a challenge, but I lifted my chin and accepted it because that is how I roll.
I had a hard time, naturally, trying to figure out how to do this... I had to pick the best alternative method of cooking the squash. I had a toaster oven, a Nuwave oven, and a microwave... The microwave was automatically a no, and the toaster oven, while it would have been good if there was much room in there, and the Nuwave works more like a broiler, but there was enough room for two, halved squashes. I picked the Nuwave. It isn't necessarily my favorite method of baking things, but that Nuwave has done me many great services whenever there is an oven fail. I managed to make a delicious dinner despite the adversity I faced in the kitchen. And my husband? Well, he was all over that squash. 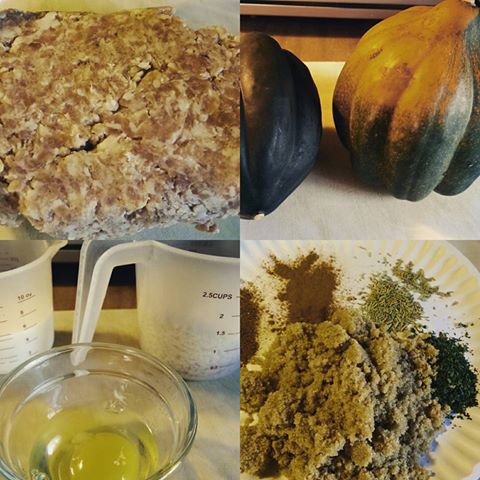
THE RECIPE
If you are using a normal oven...
Preheat to 175 c/350 F
In a large mixing bowl...
Combine sausage, sugar, seasoning, milk, bread crumbs, and egg. Use hands to mix well.
Brush squash halves with....
Olive Oil, and sprinkle with salt and pepper.
Form sausage into four, equal balls....
And place each into the cavities of the squash halves.
Bake for an hour or until sausage is cooked through, and squash is tender.
If using a Nu-wave - bake for 45 minutes or until the same results are achieved.
Let me tell you that when I first ate a bite of this, I was kind of shocked at how delicious is was. It has a nice, sweet and savory thing going on! I absolutely loved it, and it wasn't exactly as Bruce's mom made it, but it was still Bruce approved. If I can get the man to eat veggies, I am a happy wife.
I hope you enjoy this recipe as much as I have! I certainly had fun making this one and taking up the challenge that he issued. A word to the wise, men, telling your wife, "But my mom made it this way," is not cool, man... I say with amusement. But I digress, please do give this one a try even if you are not a fan of squash, you might be surprised! Much Love Kimmie |

The Eccentric Foodie
Food Tip
Cooking bacon in the oven is the easiest way.
Recipes
These are various recipes that either I created, or I found and adjusted to what I thought would be awesome or even healthier. Archives
March 2020
Categories
All
|
 RSS Feed
